Short answer: William Morris built his botanical wallpapers on a clear structure, not on flowers alone. Trellis uses a lattice, Jasmine uses a hidden winding branch, and Marigold places large blossoms over smaller flowers. Beginners can borrow each idea for an original pattern without copying a single motif.
Museum facts come from The Met’s object records and are cited beside each claim. “Our reading” and the exercises are ArtistCastle’s own interpretation, not museum statements.
- How to study William Morris pattern design as a beginner
- Trellis: a lattice gives the roses a frame
- Jasmine: a hidden winding branch carries the leaves
- Marigold: two flower sizes create depth
- Which structure should you try first?
- Try this: a 15-minute sketch exercise with three structures
- A quick note on Arts and Crafts
How to study William Morris pattern design as a beginner
Most beginners look at the flowers first. Try looking at the skeleton instead. Before you notice color or petals, ask three questions:
- What frame holds the design together?
- Which path does your eye follow?
- How many flower sizes are doing the work?
Three wallpapers in The Met’s collection answer those questions in three different ways, which makes them a practical starting point for William Morris pattern design. The Met notes that Morris designed forty-one wallpapers, so this is a small, focused sample rather than the whole story. Each example below gives you a structure you can test in your own sketchbook.
Trellis: a lattice gives the roses a frame
Museum facts: The Met’s Trellis record dates the sheet to 1864 and says Morris conceived the design in 1862 as his first wallpaper. It describes a vine-like rose bush woven through a trellis, inspired by a trellised rose in the garden at Morris’s Red House. The Met credits the architect Philip Webb with designing the birds. In the Met’s colorway, a gray trellis, pink roses and blue birds sit on a cream ground. The company also offered blue or gray backgrounds from 1868.
What to look at: Start with the annotated copy. Trace the lattice lines with your eye and ignore the flowers. Then follow the rose stems and notice where they cross those lines. Look for the birds last.
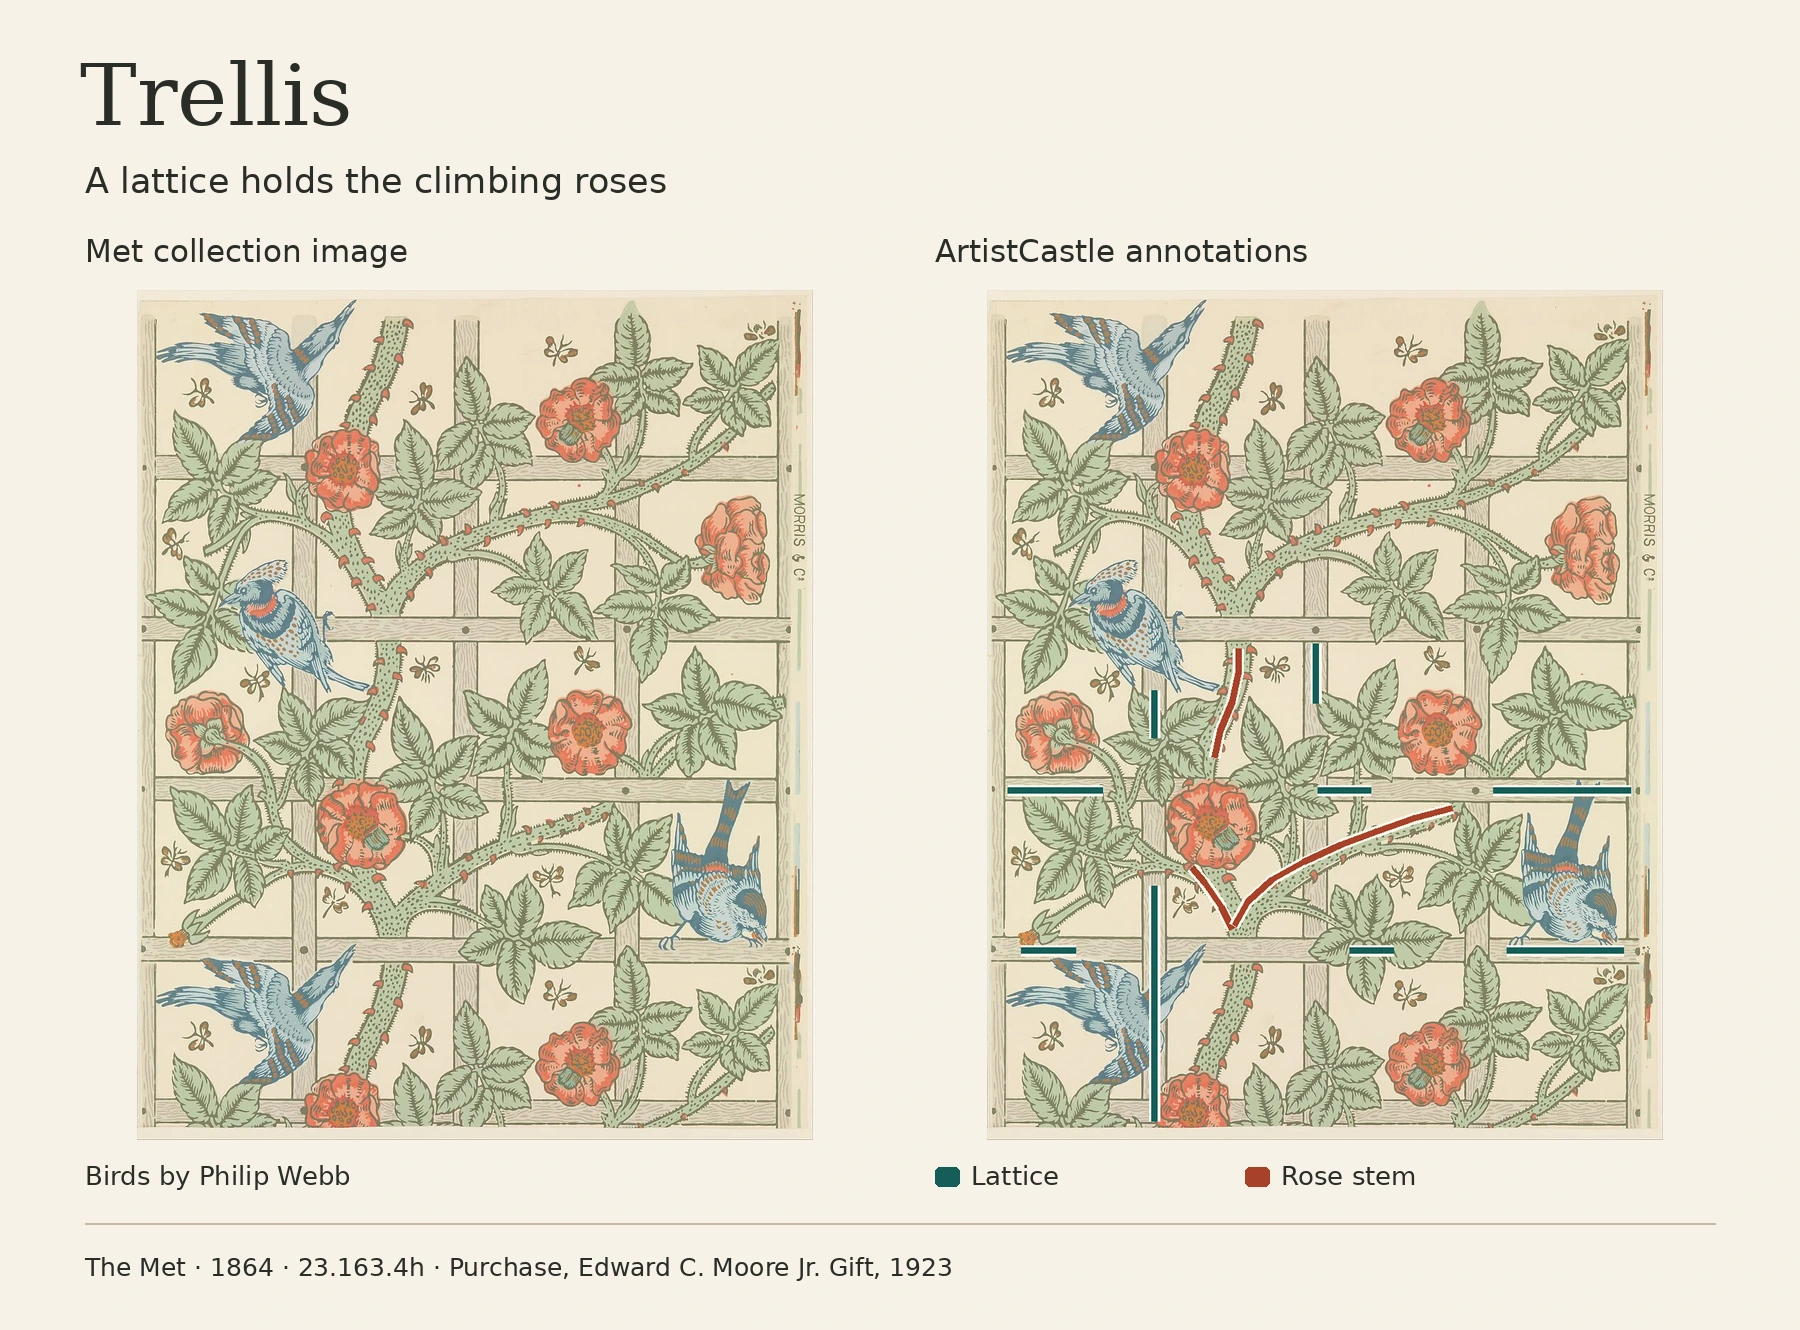
Our reading: The lattice acts like a visible frame. It gives the eye something orderly to hold, so the roses can look loose and natural. The stems do not obey the grid. They cross it unevenly, and that tension helps keep the pattern from feeling stiff.
Apply it: Draw a simple grid in a pale tone. Let one stem climb through it, crossing some lines and skipping others. Add a few small accents, such as buds or berries, where the stem meets the grid. Keep the grid quiet so the flowers lead.

Jasmine: a hidden winding branch carries the leaves
Museum facts: The Met’s Jasmine record says it was first produced in 1872 and uses three shades of green, enhanced with yellow and brown. It describes hawthorn leaves, blossoms and branches organized around a disguised vertical meander and elaborated with scrolling jasmine. The company also offered a variant with yellow leaves and a pale green ground.
What to look at: In the annotated copy, find the dashed winding path first. It is ArtistCastle’s interpretation of the winding movement The Met describes as a disguised vertical meander. Follow it from top to bottom and notice how the main leaves and blossoms are organized along it. Then look at the highlighted jasmine vines. They are finer than the main branch and curl through the spaces between.
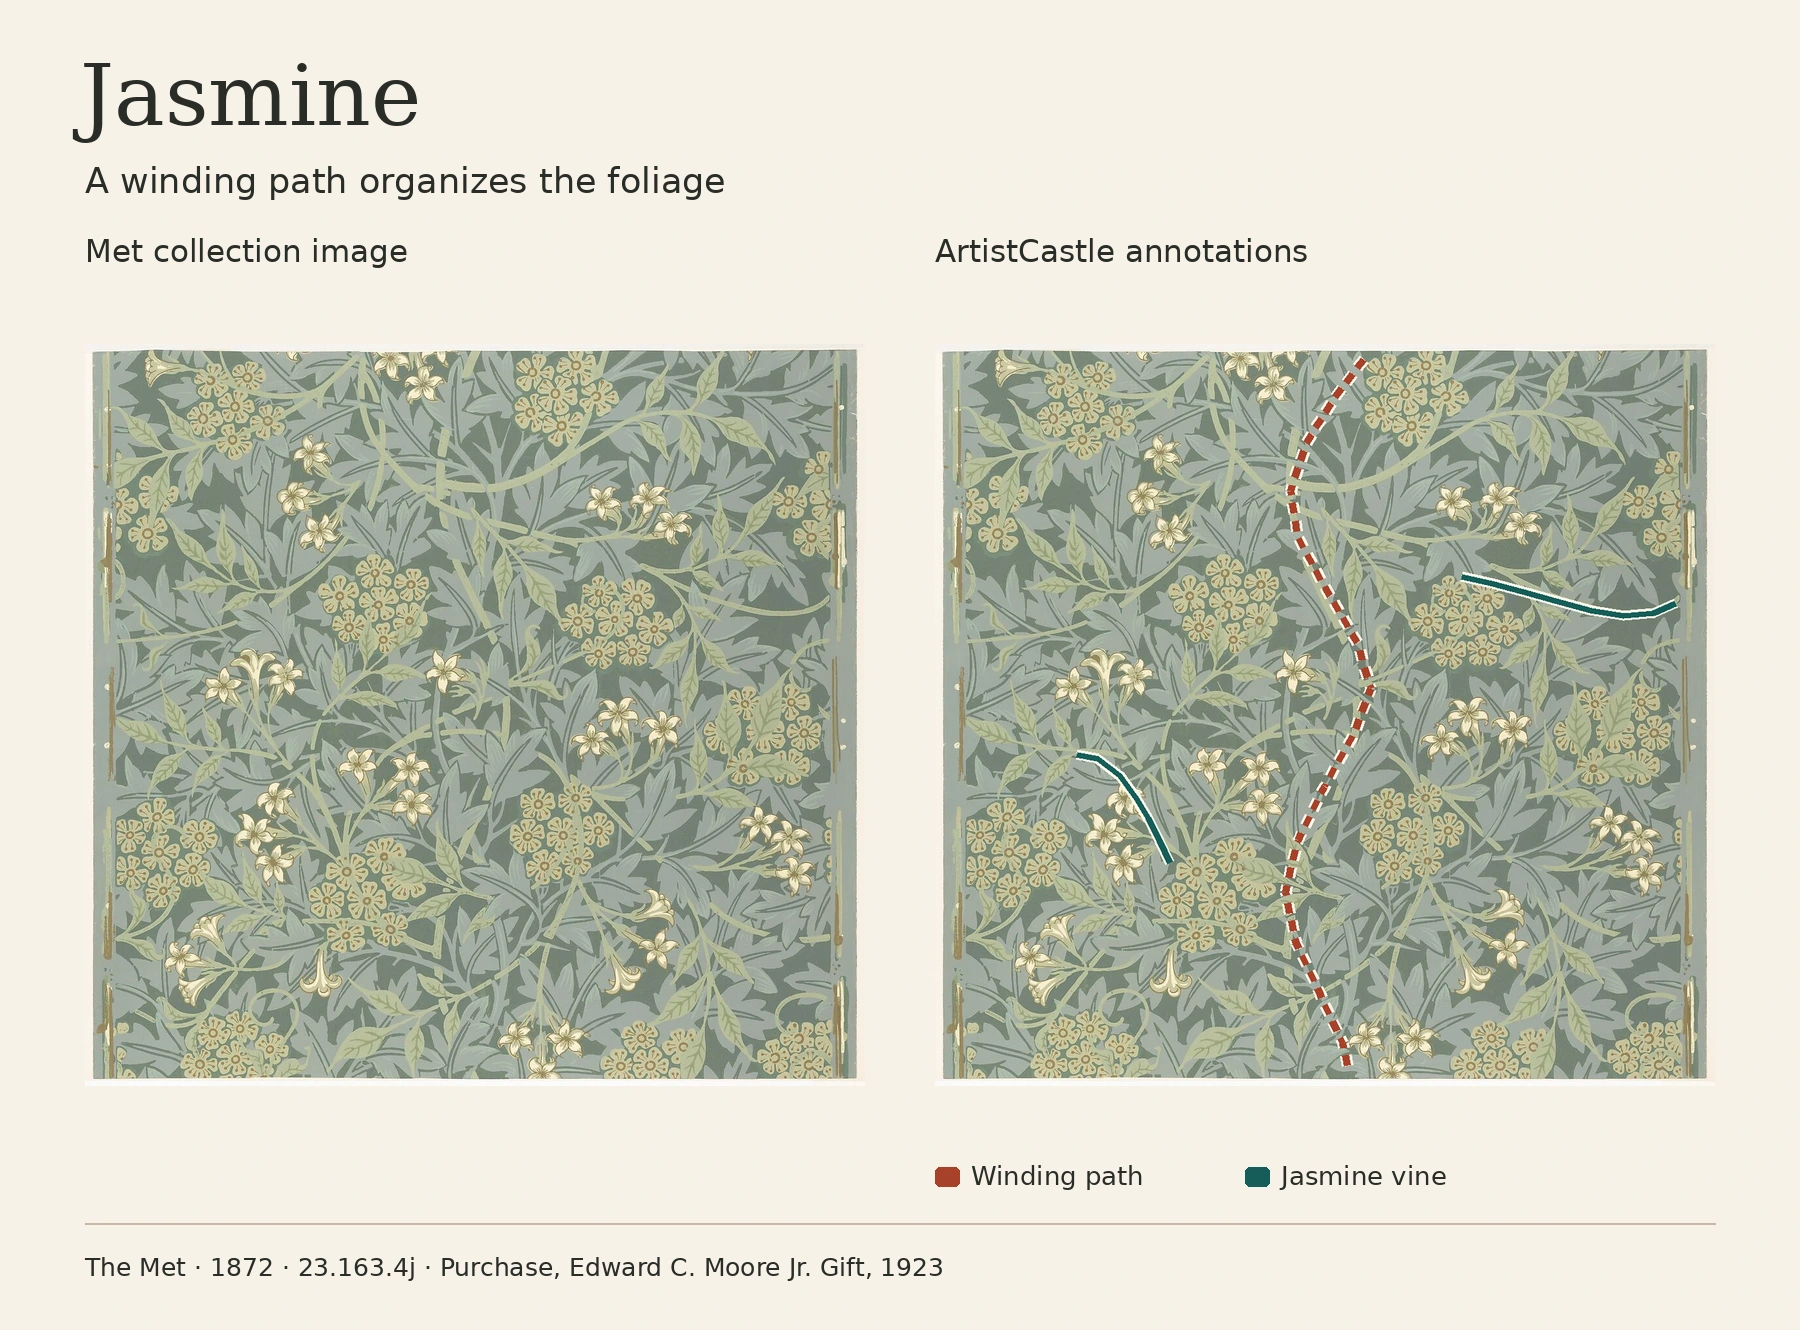
Our reading: The winding line works like a spine. Because it is disguised, you feel the rhythm without seeing a rigid stem. The jasmine adds a second layer of finer lines over the larger leaves, which fills gaps and softens the path.
Apply it: Sketch a wavy vertical guide line first. Build your main leaves and flowers along it, alternating sides. Then add thinner scrolling stems that cross the guide and fill the gaps. Fade the guide at the end. This can also help with obvious repeats, because a flowing path breaks up stiff, even spacing.
Marigold: two flower sizes create depth
Museum facts: The Met dates this sheet to 1875. Its Marigold record describes large single blossoms amid leafy meanders over a ground of smaller flowers, and says the forms show close observation of native flowers. The Met calls the pattern monochrome and says it was offered in blue (as shown), dark red or light brown. It adds that the cream area at the top reveals the edges of the wooden blocks used to print the design.
What to look at: In the annotated copy, compare the two groups of circled flowers: the large blossoms and the smaller flowers behind them. Which group does your eye land on first, and why? Then follow the leafy lines moving between the big blooms. The cream strip at the top is the area the Met says shows the block edges. Treat it as a clue about how the sheet was made, not as a pattern lesson.
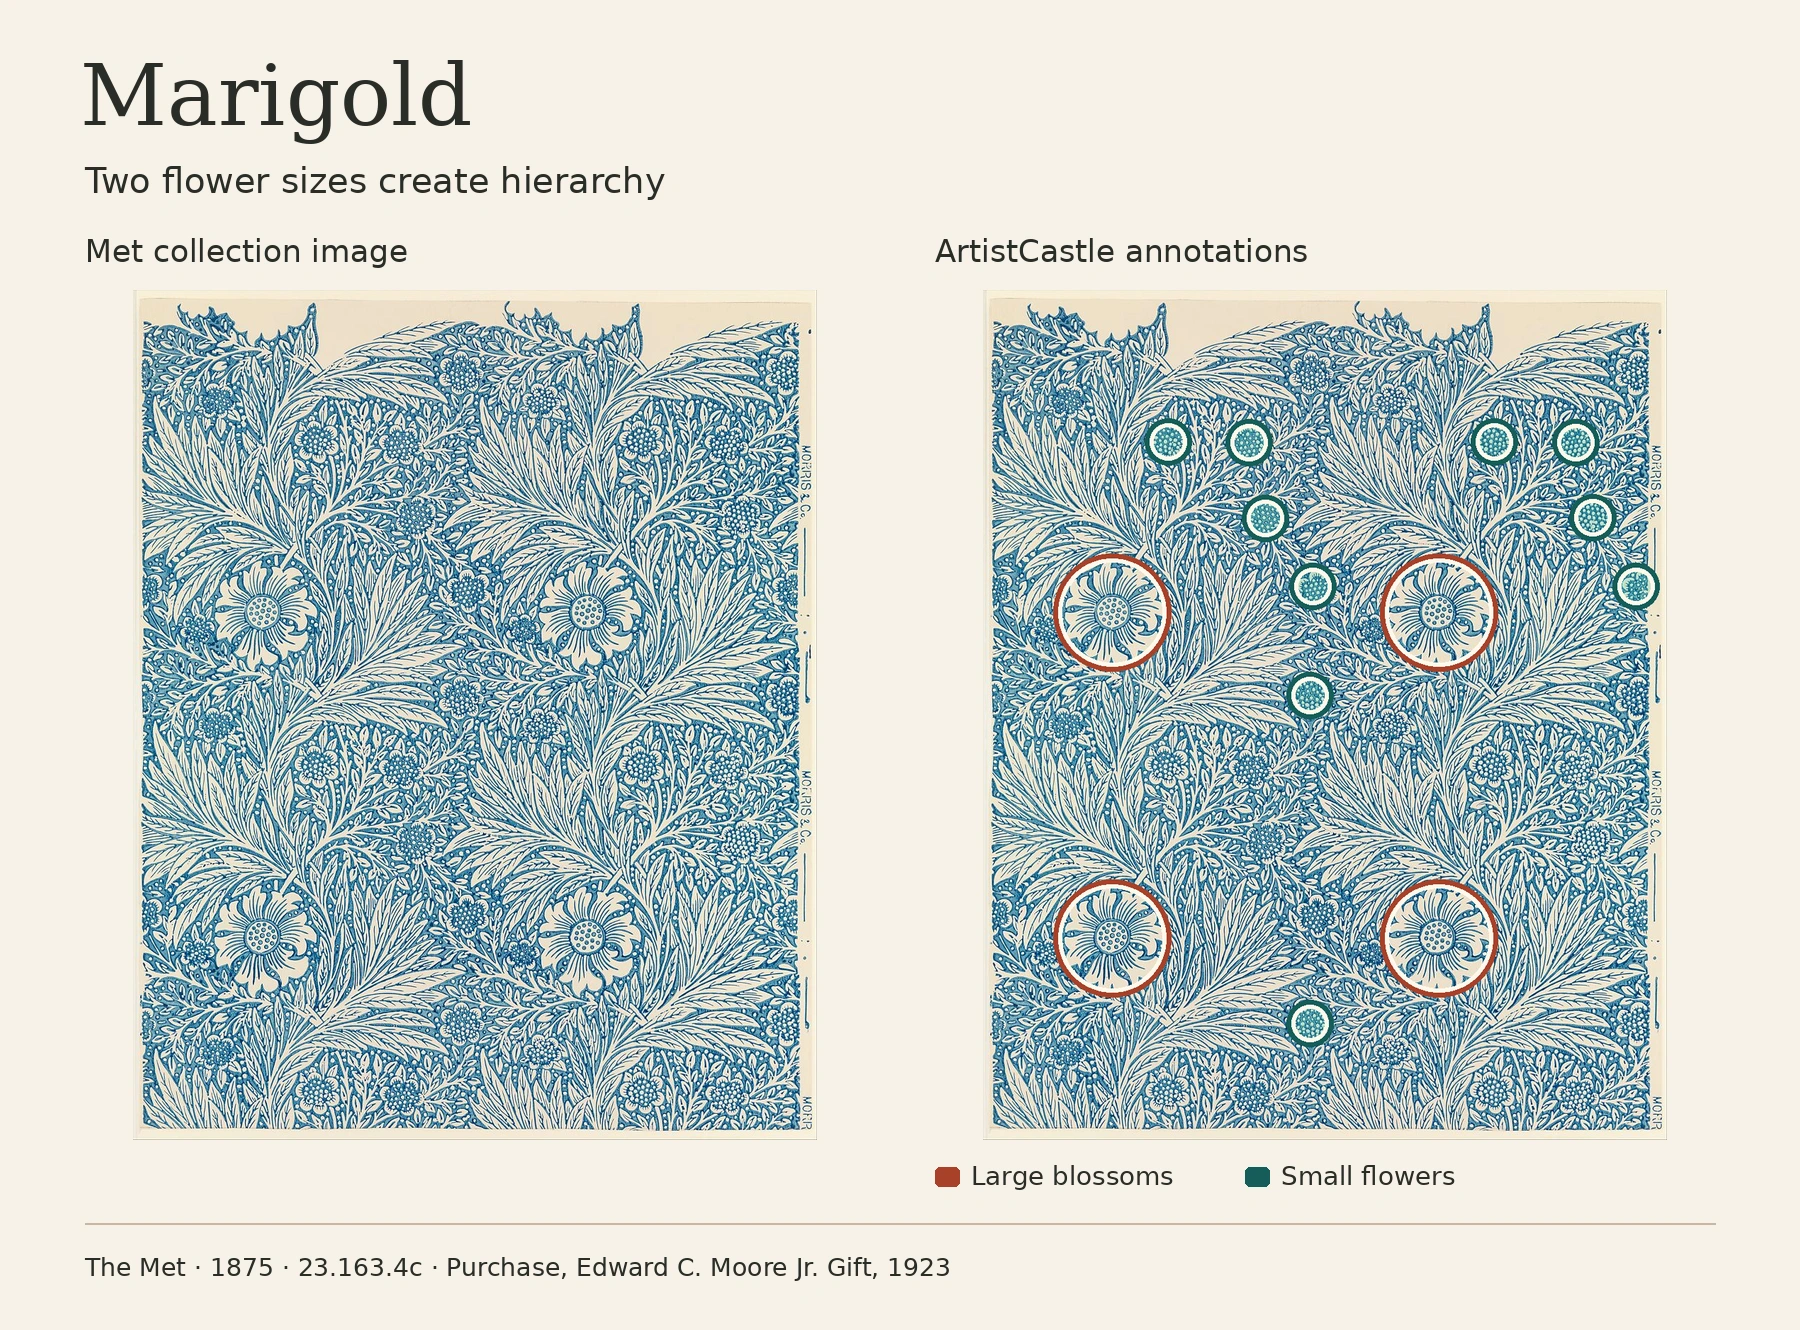
Our reading: The small flowers form a calm background, so the large blossoms read as the focal layer. With a single color family, the size difference does most of the work. Contrast comes from scale, not from a crowd of colors.
Apply it: Choose a clear size gap between your big and small flowers. Place the small layer first, then add the large blossoms with room around them. Try it in one color first. If the hierarchy reads clearly in a single color, adding more colors later is easier.
Which structure should you try first?
This is our judgment, not a museum claim. Pick the structure that matches the problem you are solving.
- Lattice (Trellis): best when your motifs feel scattered and you want order.
- Winding branch (Jasmine): best when your pattern looks stiff and you want movement.
- Two scales (Marigold): best when everything is the same size and the design feels flat.
If you are unsure, start with two scales. It needs the fewest drawing decisions and works well in a single color. A clear structure also makes a pattern easier to adjust and to expand into a small coordinated collection later.

Try this: a 15-minute sketch exercise with three structures
You need paper, a pencil and one plant you can draw simply, such as a leaf sprig or a small flower.
- Divide the page into three boxes and draw the same plant in each, small and simple.
- In box one, sketch a loose lattice in light pencil and thread a stem through it.
- In box two, draw a wavy vertical guide. Place your plant along it, then add thin scrolls.
- In box three, draw a few large versions of your plant and fill the spaces with tiny ones.
- Squint at the three boxes. Which one reads clearest? Which feels most like your style?
- Pick your favorite and refine it. You can finish it on paper with ink and flat color, or redraw it as a vector motif in Illustrator if you like.
Keep the sketches rough. You are testing structure, not finishing artwork. Photograph the three boxes and keep them as a reference for your next design.

A quick note on Arts and Crafts
Morris is closely linked with the Arts and Crafts movement, which valued handmade design and plants. For how this differs from curving Art Nouveau lines, see our Art Nouveau guide. For wider style categories, see Art Styles, Patterns and Themes.