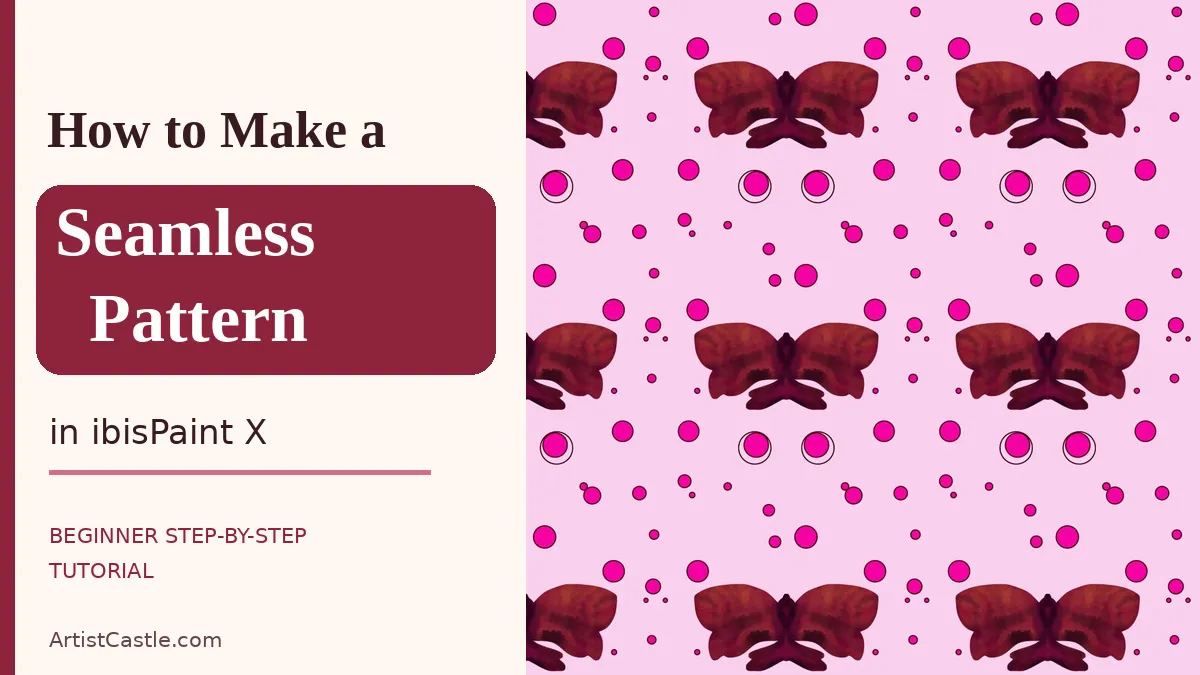
To make a seamless pattern in ibisPaint X, draw a motif on a square canvas and fill the background on its own layer. Then open Transform, switch Repeat on, and set Translation X to half the canvas width. On my 2048 px canvas, that was 1024 px. Add filler shapes, merge the layers, and save the finished square canvas as your tile. Use Repeat and Zoom only afterward to preview how the tile repeats.
The Mirror Ruler is optional. It helps you draw a symmetrical motif, but the seamless repeat comes from Transform and Repeat.
Some screenshots below come from the Windows version of ibisPaint, so panels may look a little different on your phone or tablet.
Watch the ibisPaint X Video Tutorial
See how I use the Mirror Ruler and Transform Repeat to create a seamless pattern in ibisPaint X. Follow the written steps below for detailed instructions and screenshots.
Step 1: Create a square canvas
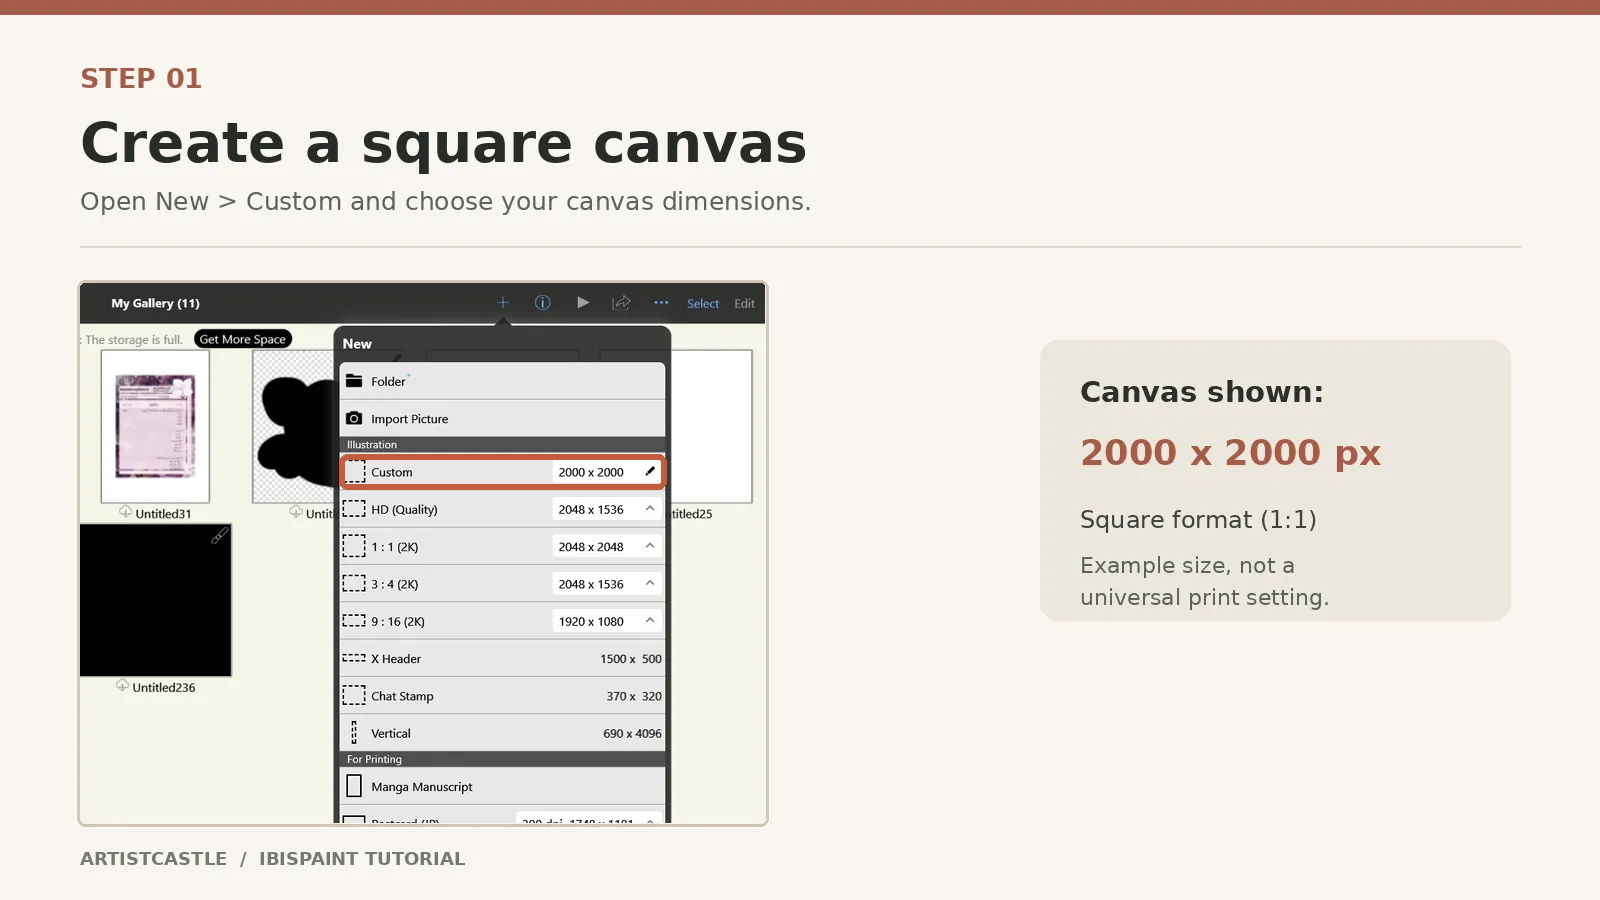
Open My Gallery, tap the + button, and choose Custom under Illustration. Enter your canvas size.
I used 2048 × 2048 px, which I checked in Artwork Information. The Custom field in the screenshot below shows 2000 × 2000 px as an example entry. Either way, it’s a practice size, not a print rule. A square canvas makes the edges easier to line up.
If you plan to print or sell the pattern, pixel size matters. Read seamless pattern size for fabric printing before you commit to a size.
Step 2: Turn on the Symmetry Ruler
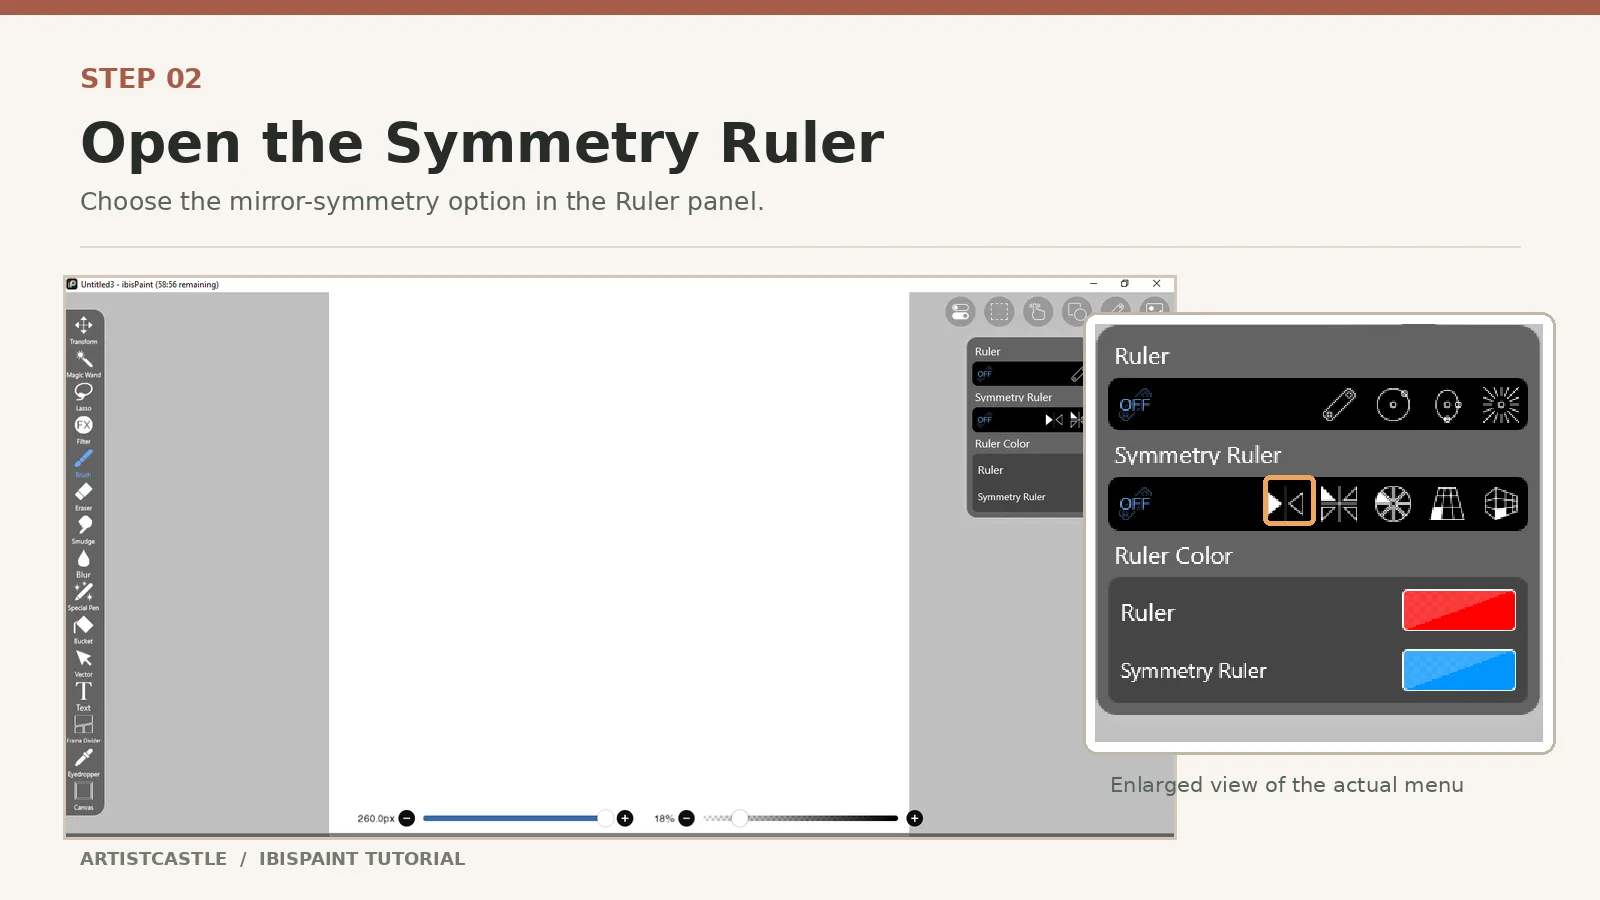
Open the Ruler panel. In the Symmetry Ruler row, choose the first option, the mirror icon. This tutorial calls it the Mirror Ruler.
Step 3: Draw your motif with mirror symmetry
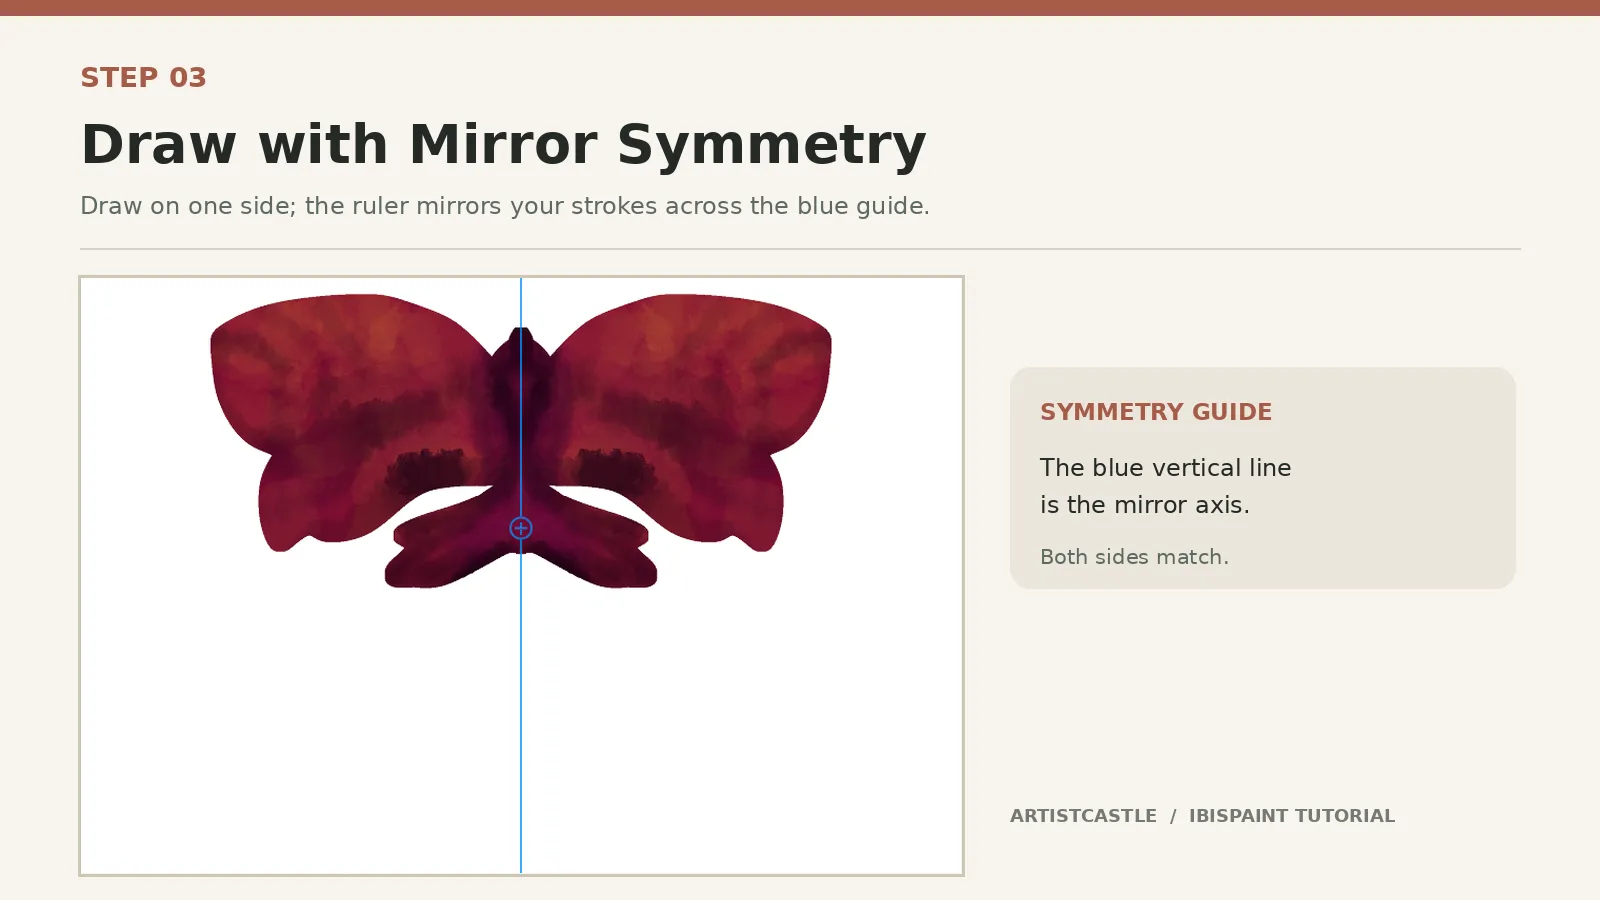
Draw on one side of the blue guide line. The ruler copies every stroke to the other side, so both halves match.
Leave plenty of empty space around the motif. You’ll fill it later. If you’re unsure how large to make it, read pattern repeat size vs. motif scale.
Not every pattern needs symmetry. You can skip Steps 2 and 3 and draw a motif freehand.
Step 4: Fill the background on its own layer
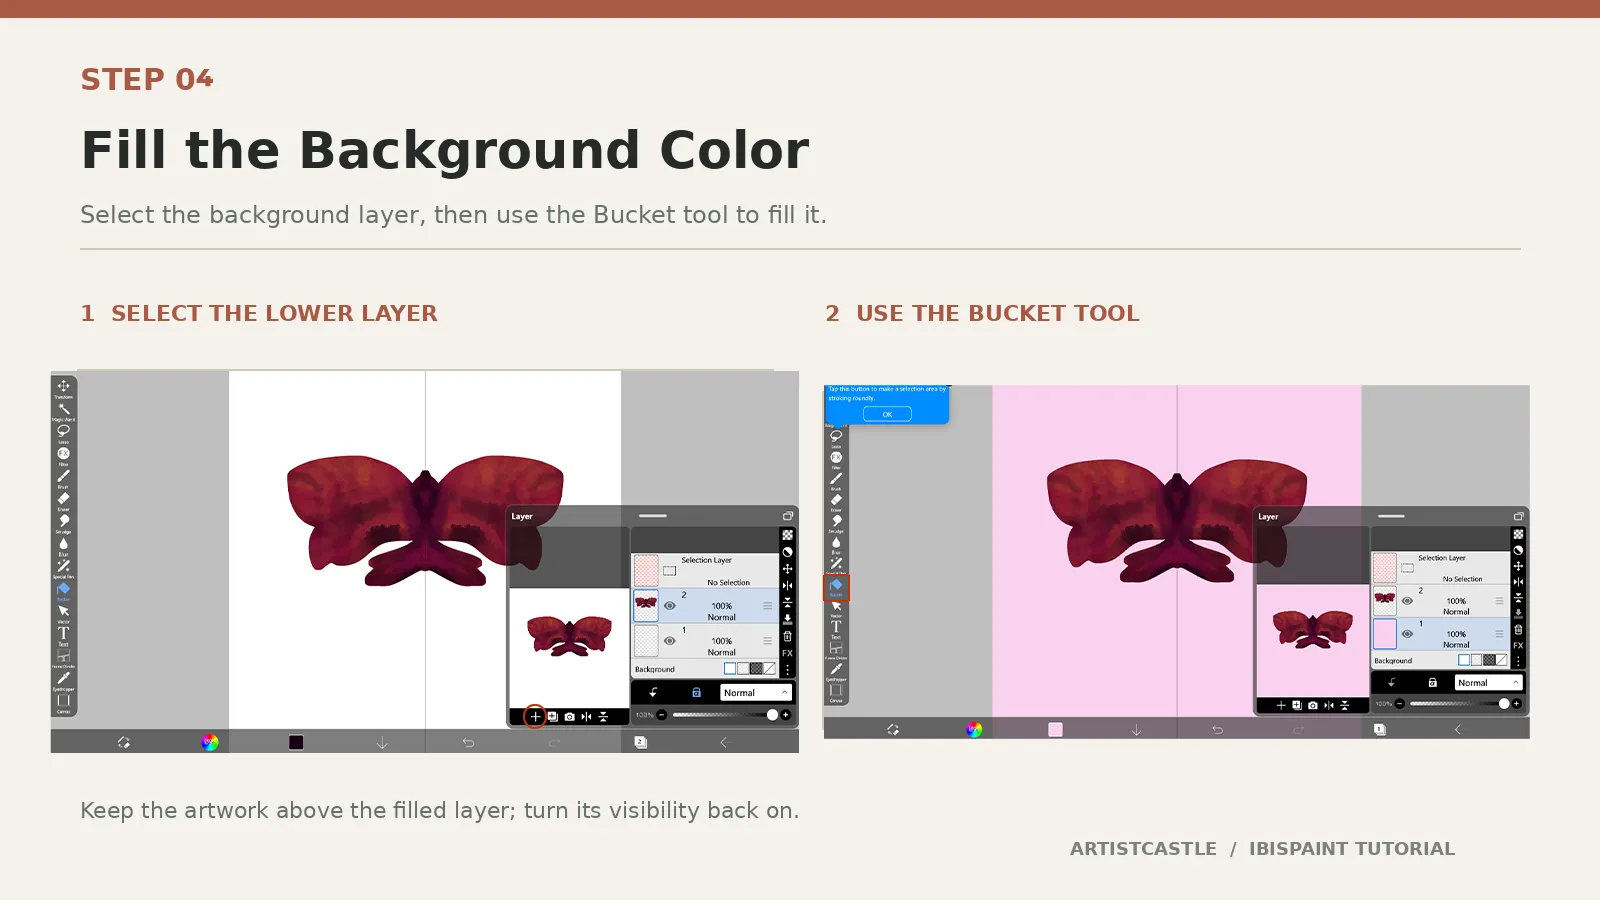
Keep your motif on its own layer. Select a lower layer and use the Bucket tool to fill it with your background color. Then make sure the motif layer’s visibility (the eye icon) is switched back on.
A separate fill layer means you can move the motif later without moving the background.
Step 5: Open Transform and find Repeat
Select your motif layer. Tap the Transform tool at the top of the toolbar and stay on the Translate Scale tab.
You’ll see the Repeat switch, Translation X and Translation Y sliders, Zoom, Angle, and Interpolation. In my tutorial, Interpolation was set to Bilinear (Normal) and Target was set to Current Layer, so only the motif moves, not the background.
ibisPaint’s Transform tool guide describes Repeat as a switch that turns the repeat display on or off.
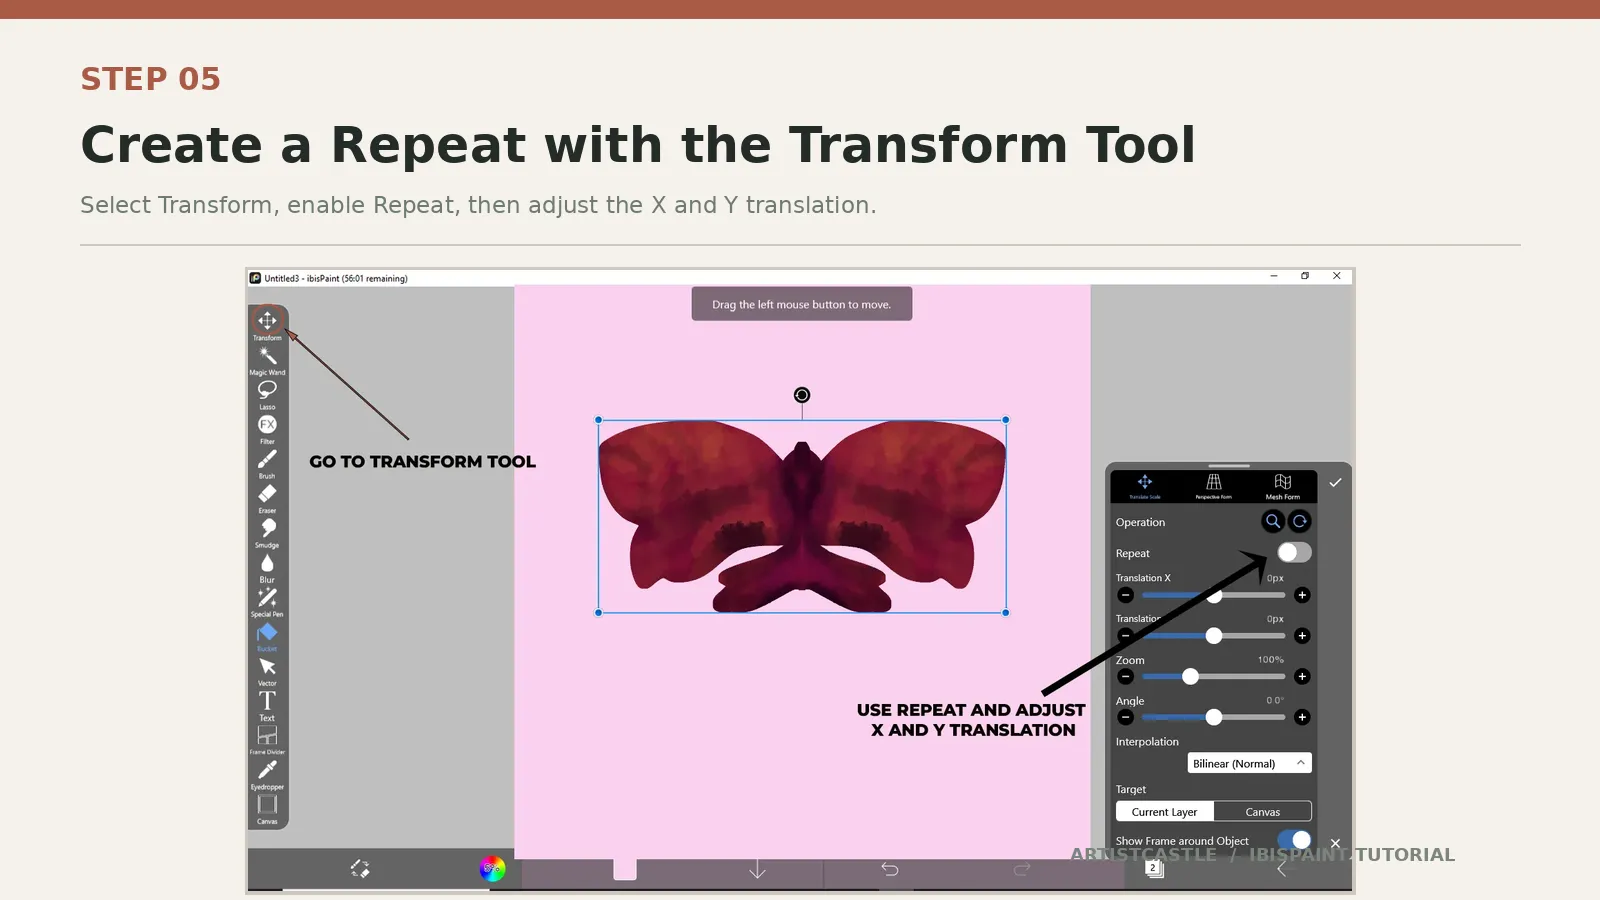
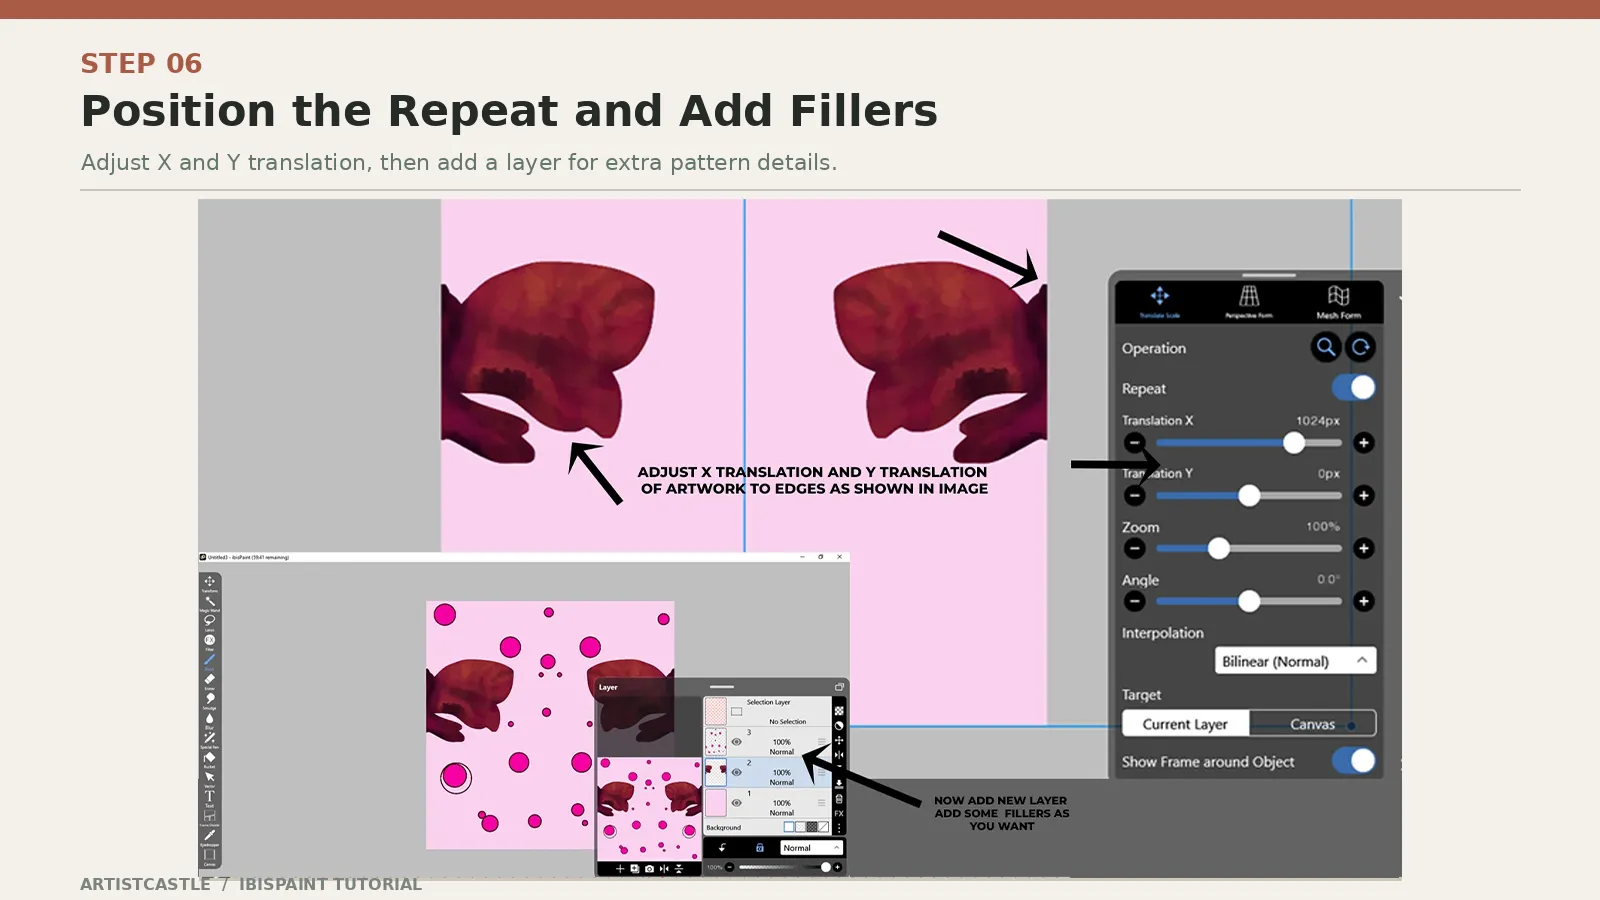
Step 6: Split the motif across the edge, then add fillers
Switch Repeat on and set Translation X to 1024 px, with Translation Y at 0 px. That’s exactly half of my 2048 px canvas. My motif was drawn near the center, so this moves its center onto the canvas edge. The two halves of the motif then appear on opposite edges. Tap the ✓ to apply the move.
Now add a new layer above the motif and draw your fillers: dots, small shapes, whatever suits the design. Vary their size and spacing so the repeat doesn’t look obvious. If it does, this guide helps: why your seamless pattern looks repetitive.
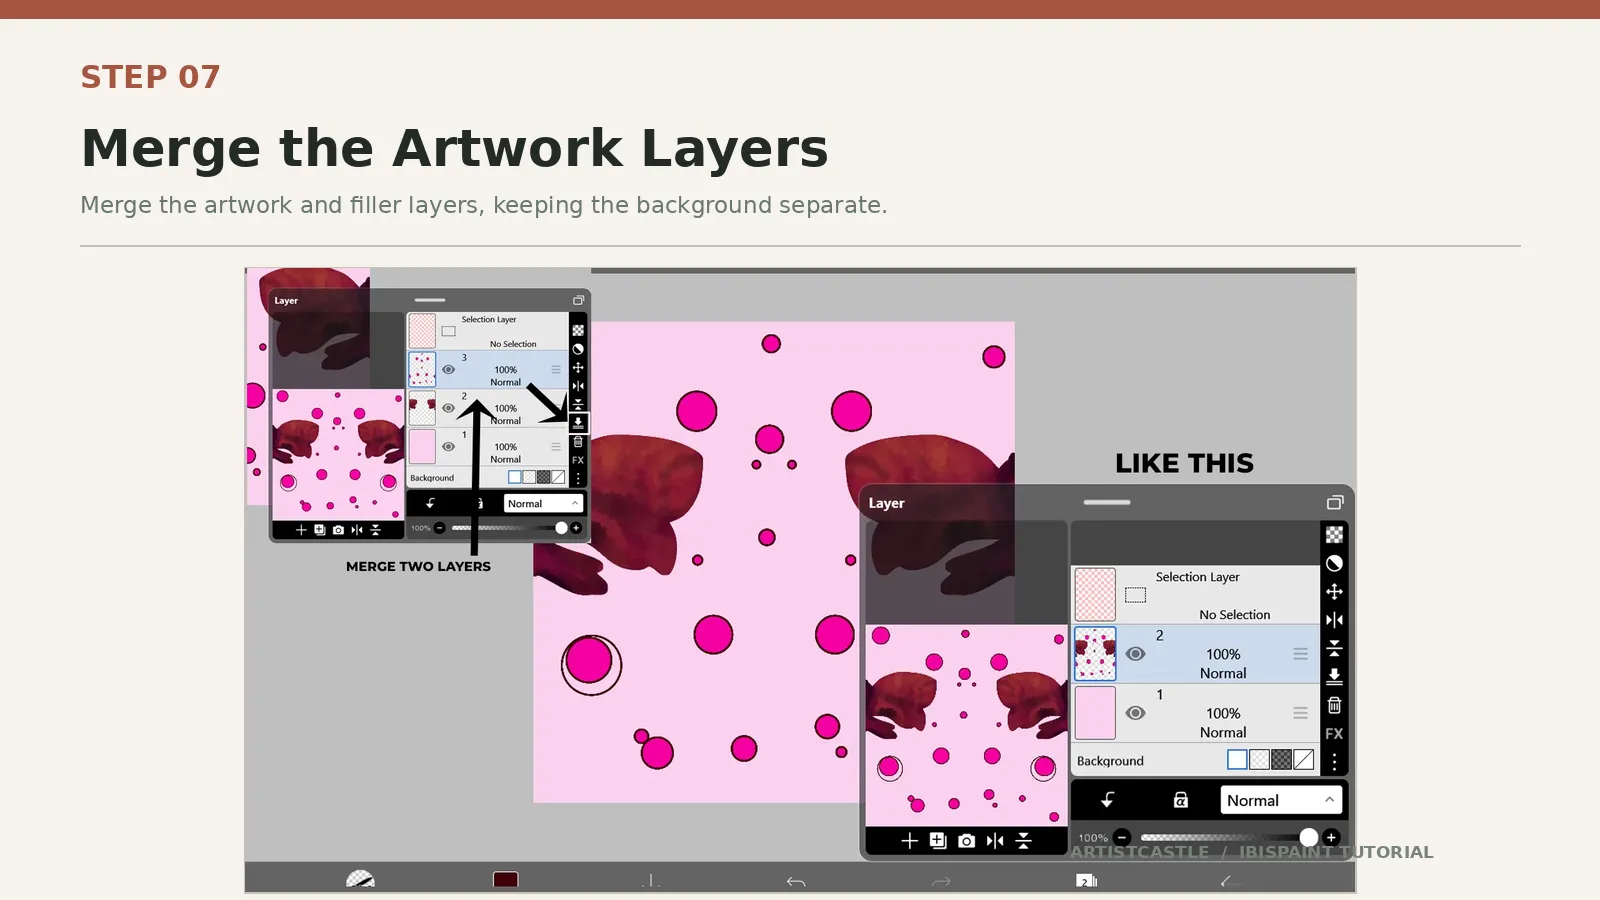
Step 7: Merge the motif and filler layers
In the Layer window, select the filler layer and tap the merge icon, the arrow pointing down at a line. Your motif and fillers become one layer. The background fill stays separate on the layer below.

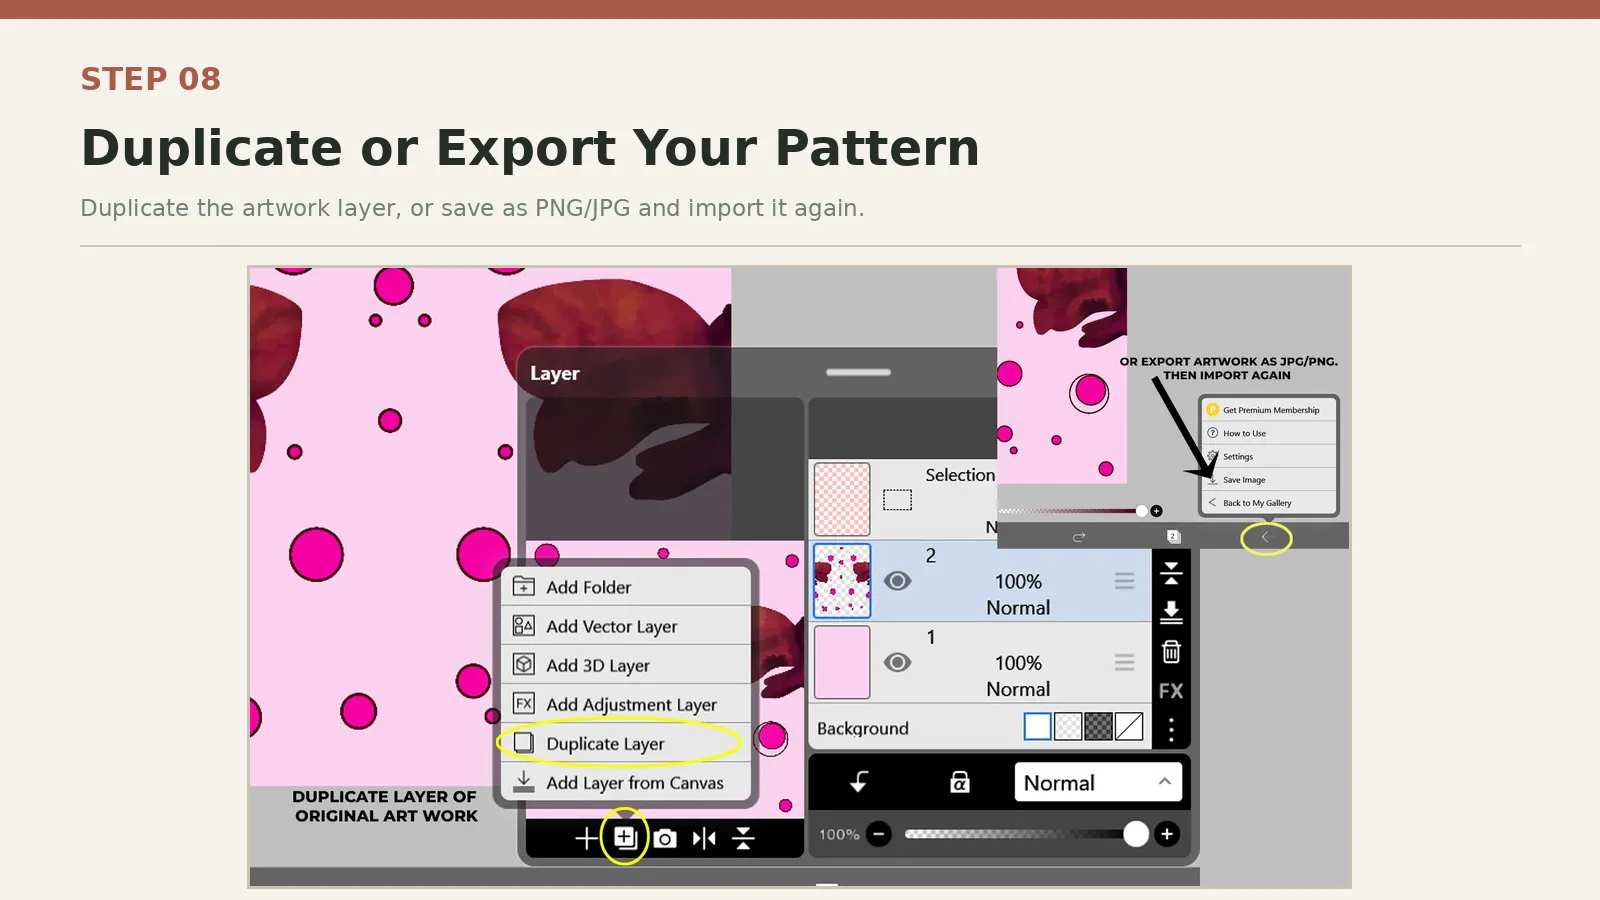
Step 8: Duplicate the layer and save your square tile as a JPG
Duplicate the merged artwork layer containing your main motif and fillers before exporting. This keeps a backup of your artwork in case you need to make adjustments later. Leave the background layer separate, then save your completed square tile as a JPG.
In the Layer window, tap the add-layer button (the one with the small square) and choose Duplicate Layer. Then tap the back arrow, choose Save Image, and save the finished square tile as a JPG. ibisPaint’s export guide covers the Save Image options, including CMYK, which is limited to Prime Members and Pro Upgrade users. Spoonflower asks for sRGB files, so you can skip CMYK for fabric uploads.
I then tested the exported JPG as a repeat, and it showed no visible seams.
Step 9: Preview how your tile repeats
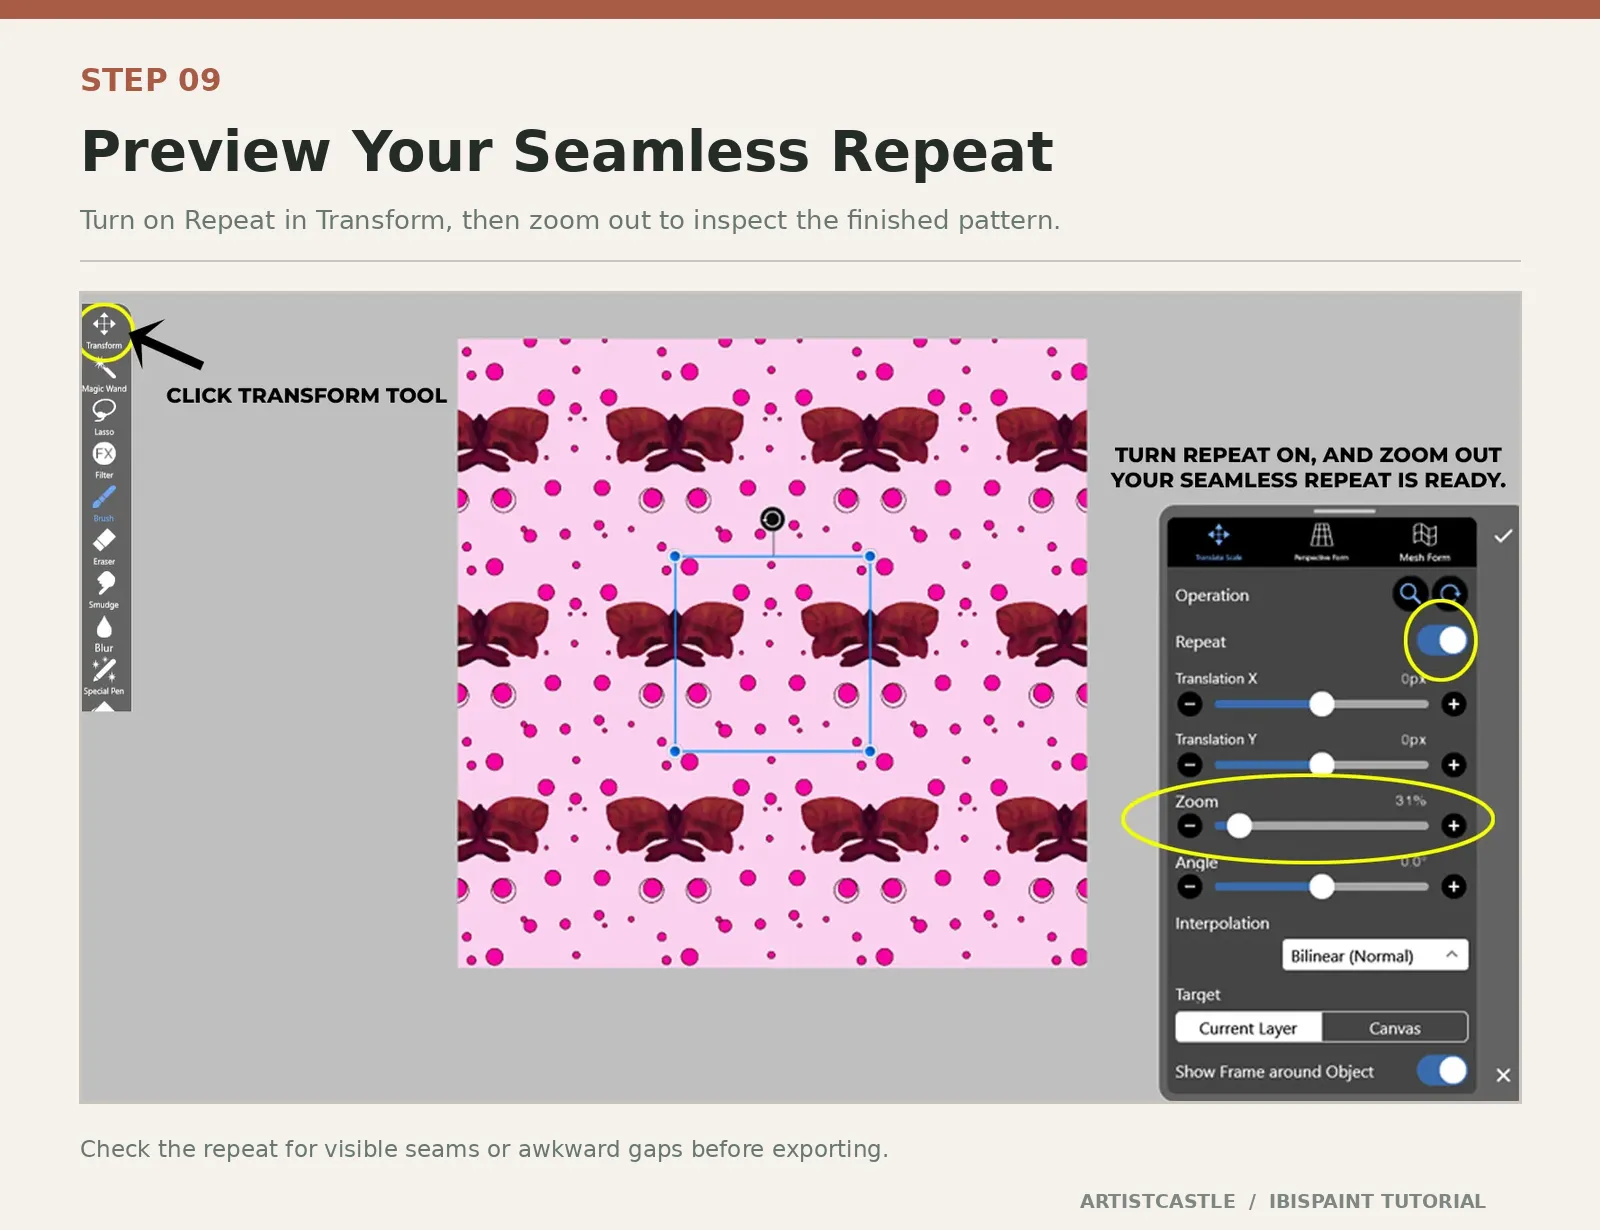
After saving the tile, open Transform and switch Repeat on. Drag the Zoom slider down. The screenshot shows 31%. The blue frame marks your single tile, and everything around it is the repeat. I tapped ✓ Apply afterward.
This view is only for inspecting how the tile repeats. Look for visible seams, awkward gaps, or shapes that line up in obvious rows. The zoomed-out view is not your seamless tile, so don’t export it. Your tile is the square JPG you saved in Step 8.
Before you print or upload
Before you upload or list a pattern anywhere, run your saved JPG through a tester. Our guide to testing a seamless pattern walks through it. If you spot thin lines at the edges, see why seamless patterns show white lines.
If you’re printing on Spoonflower, three facts matter:
- Spoonflower converts every upload to 150 DPI, so print size is pixels divided by 150. For example, a 3000 px tile prints at 20 inches.
- Files should be JPG or PNG, under 40 MB, in sRGB.
- Spoonflower doesn’t print white ink, so transparent areas stay unprinted. A JPG can’t hold transparency, and your filled background layer covers the whole tile.
FAQ
Do I need the Mirror Ruler to make a seamless pattern in ibisPaint X?
No. The Mirror Ruler only helps you draw a symmetrical motif. The seamless repeat comes from Transform with Repeat turned on.
What canvas size should I use?
A square canvas is easiest. This tutorial uses 2048 × 2048 px as a practice size. For printing, work backward from the final size and see seamless pattern size for fabric printing.
Should I export the zoomed-out repeat preview?
No. Save the finished square tile as a JPG first. The Transform → Repeat → Zoom view is only for checking how that tile repeats.
Can I use ibisPaint’s built-in materials in a pattern I sell?
This tutorial uses only hand-drawn shapes. If you want to use Material tool assets, read section 11 of ibisPaint’s Terms of Service. It limits using materials outside ibisPaint and redistributing them in reusable form. Drawing your own motifs avoids the question.