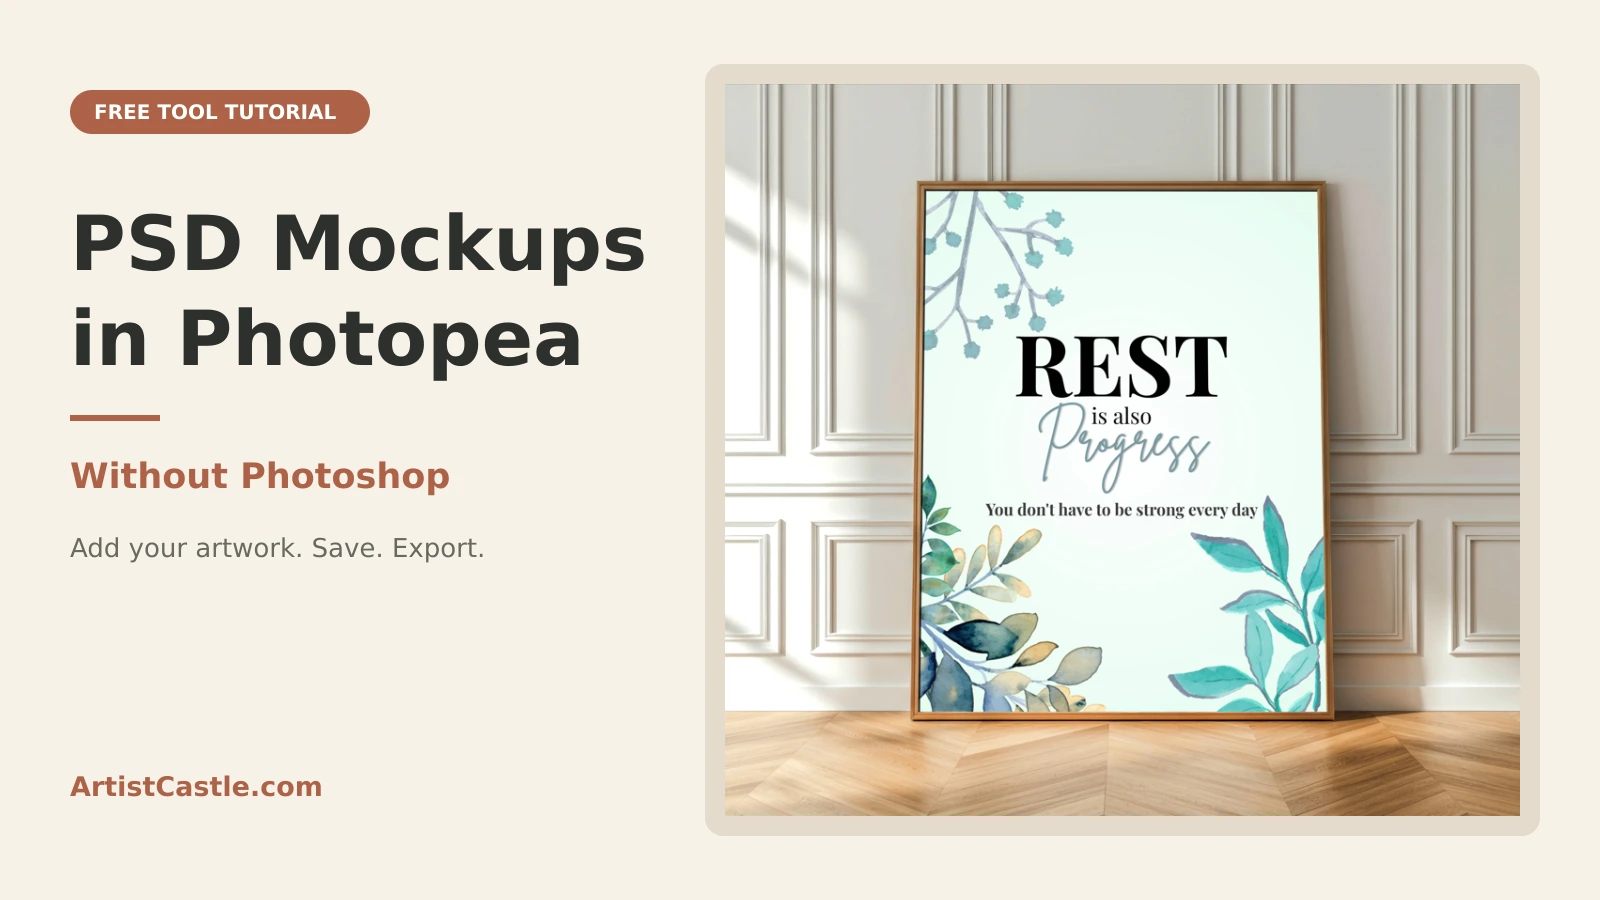
To use a PSD mockup in Photopea, open the layered PSD, double-click the smart object that holds the design area, add your artwork with File → Open & Place, and fit it. Then save the smart object, check the main scene, save an editable PSD, and export a JPG. This only works with a layered PSD that has a design smart object. A flat JPG preview can’t be edited this way.
Disclosure: ArtistCastle is part of Mockup Cloud’s affiliate programme. If you buy through the Mockup Cloud link in this article, we may earn a commission at no extra cost to you. The steps work with any compatible PSD mockup, and free options are covered too.

What you need first
Photopea’s smart object guide explains that a smart object is a layer linked to a separate source file. When you save changes to that source, the main scene updates.
A JPG preview has no layers. Photopea’s file guide notes that JPG and PNG files hold a single flat image, while the PSD format keeps the document structure. You also need your own artwork as a PNG or JPG.
The example used in this guide
The screenshots show this workflow with the Classic Frame Free Mockup by River Visual, downloaded from Mockup Cloud, and ArtistCastle’s original “Rest is also Progress” botanical wall art. Mockup Cloud may ask you to register or log in before downloading. Its listing names Photoshop as the intended software.
Layer names such as “Edit Here” and “Delete This” belong to this template. Your mockup will use its own names, so follow its labels.
Step by step: put your artwork in a PSD mockup
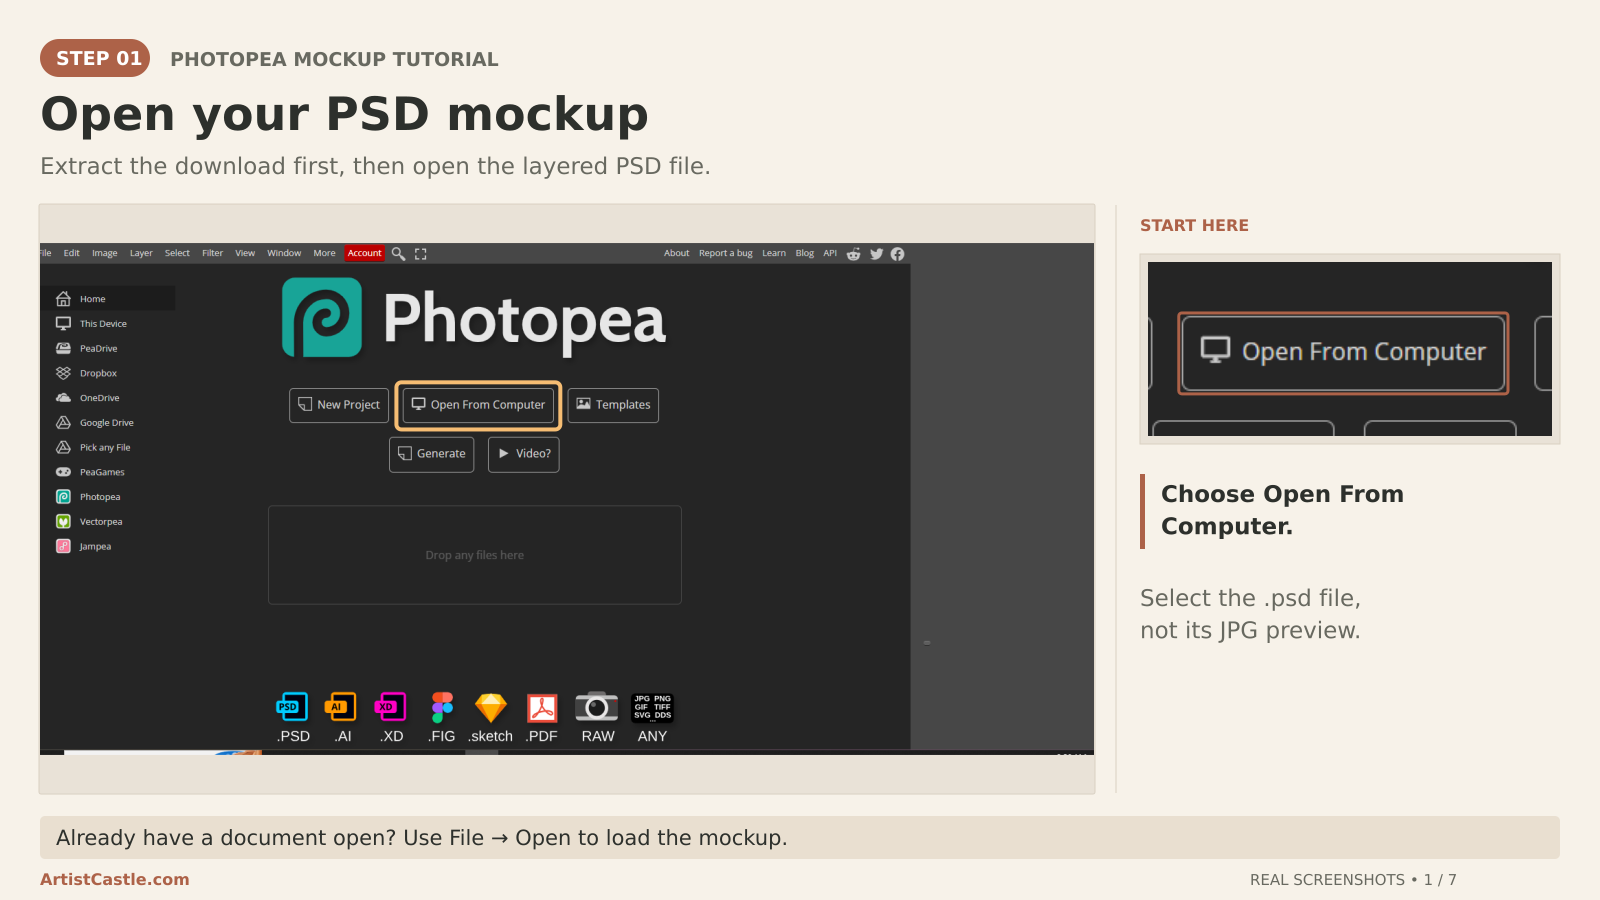
Step 1: Open your PSD mockup
If your download is a ZIP, extract it first and find the .psd file. The JPG that sometimes comes with a mockup is only a preview. Go to Photopea and choose Open From Computer, or use File → Open, then select the PSD. Large PSDs can take a while to load.
Step 2: Find the design smart object
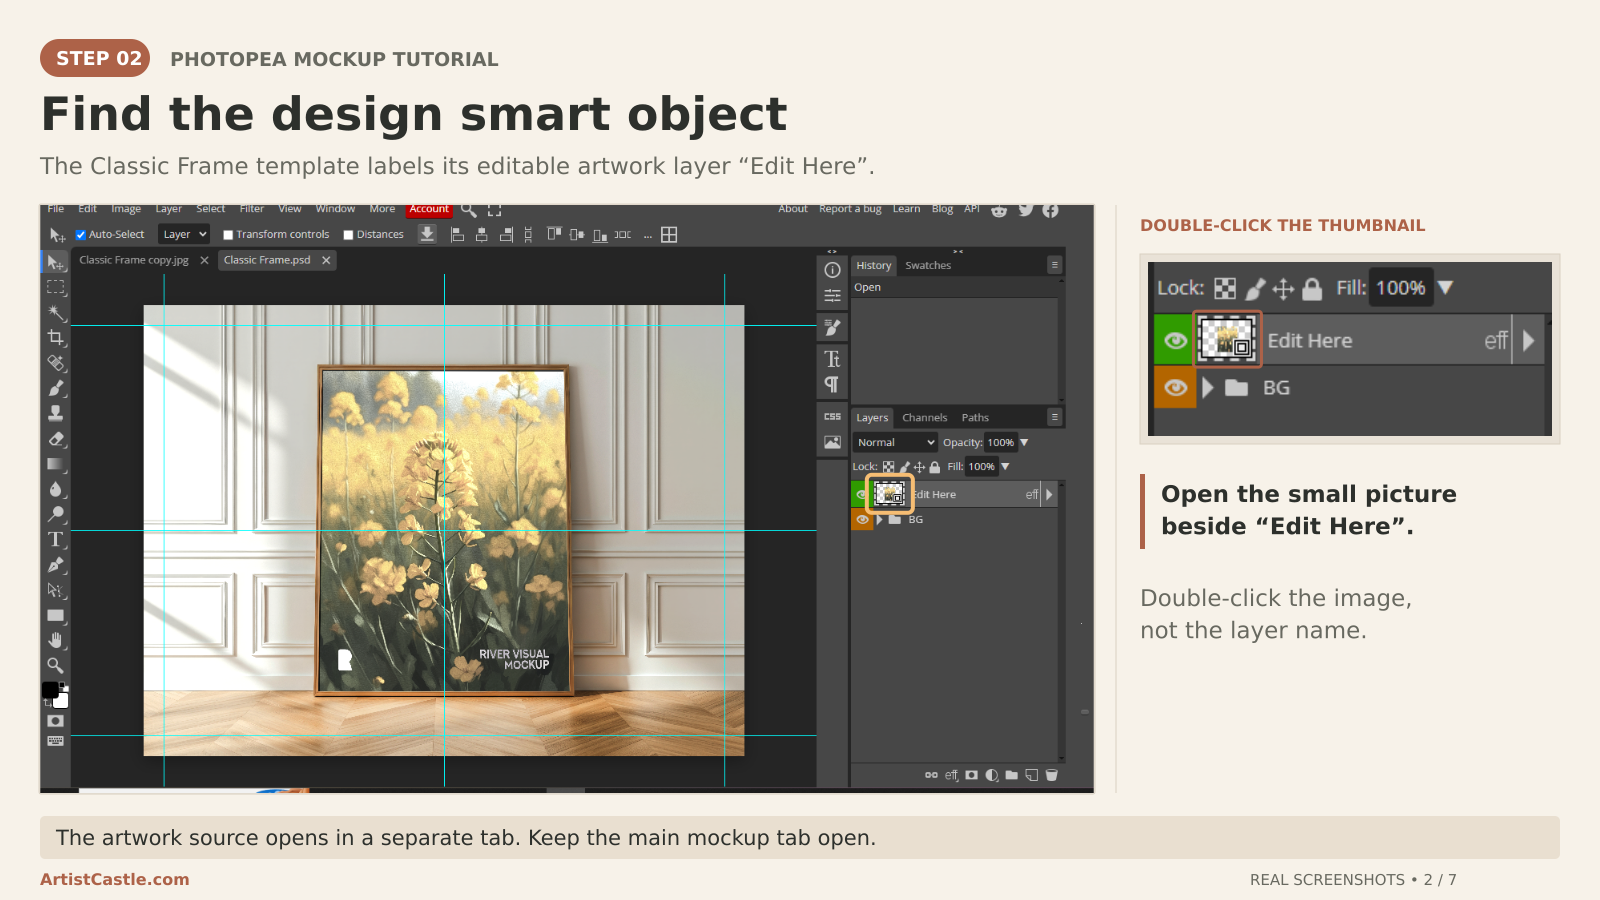
In the Layers panel, look for a layer whose thumbnail has a small sign in its bottom-right corner. That sign marks a smart object. In Classic Frame, the design smart object is labelled “Edit Here.” Some mockups contain more than one smart object, so choose the one meant for your design.
Double-click its thumbnail. It opens as a separate document in a new tab, here named Edit Here.psd. You will switch between this tab and the main Classic Frame.psd tab.
Step 3: Remove the sample artwork
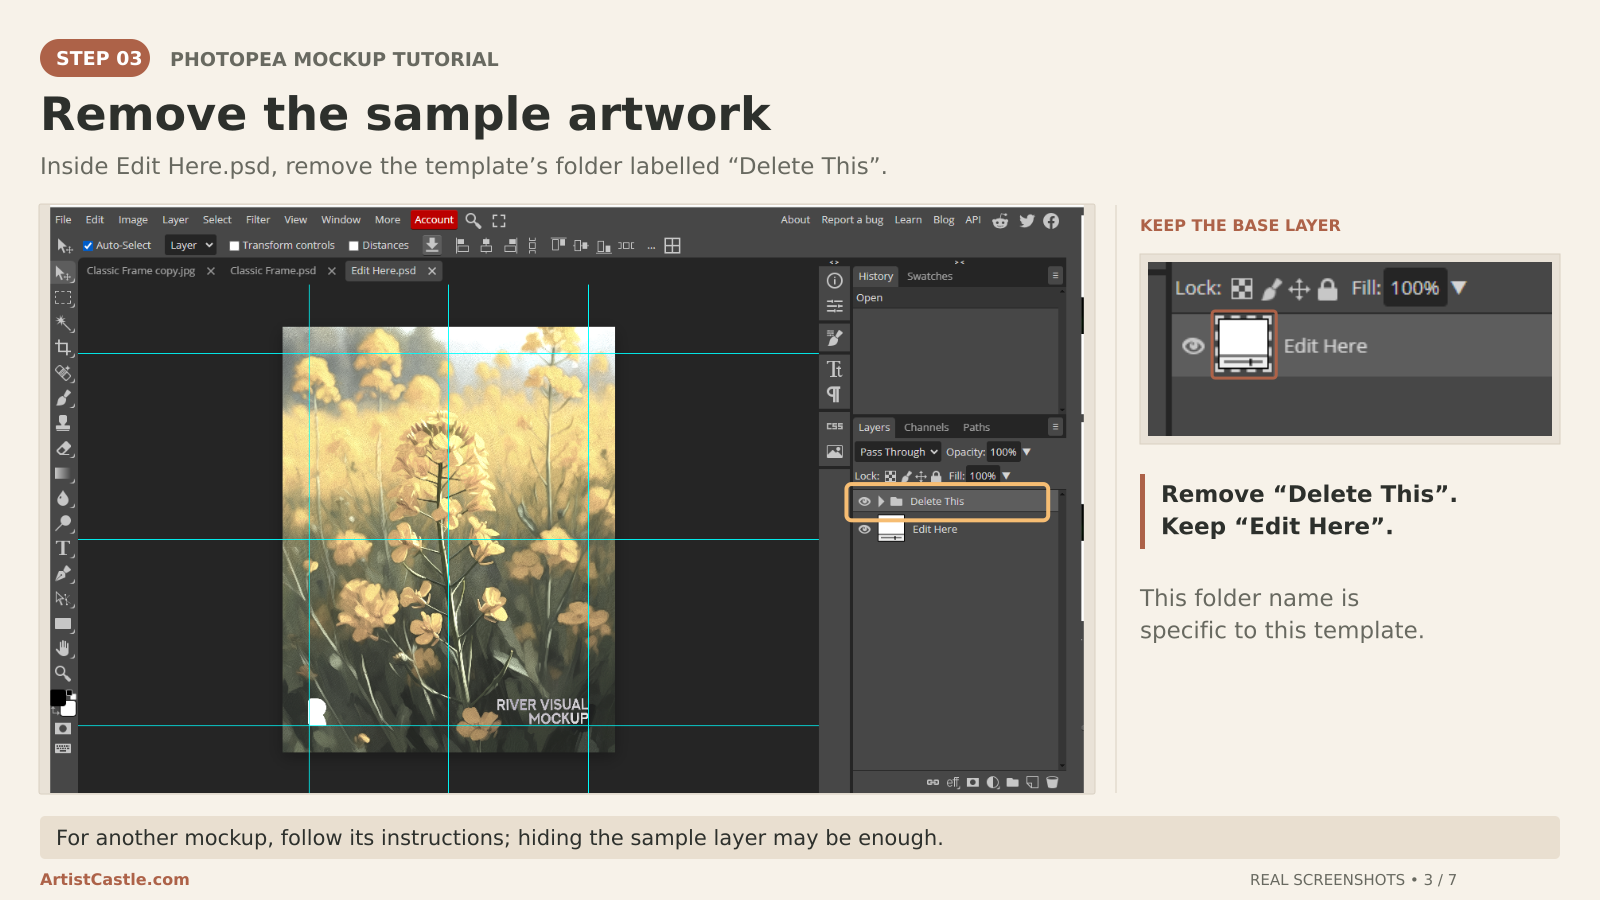
Inside Edit Here.psd, this template includes a sample folder labelled “Delete This.” Remove that folder and keep the Edit Here base layer.
“Delete This” is a name specific to this template. Other mockups label or arrange their samples differently, so follow the mockup’s own instructions rather than deleting layers you don’t recognise. If you would rather keep a sample for now, click its eye icon to hide it (see Photopea’s layers guide). Leave any effects, masks, textures and adjustments the template relies on exactly as they are.
Step 4: Place and fit your artwork
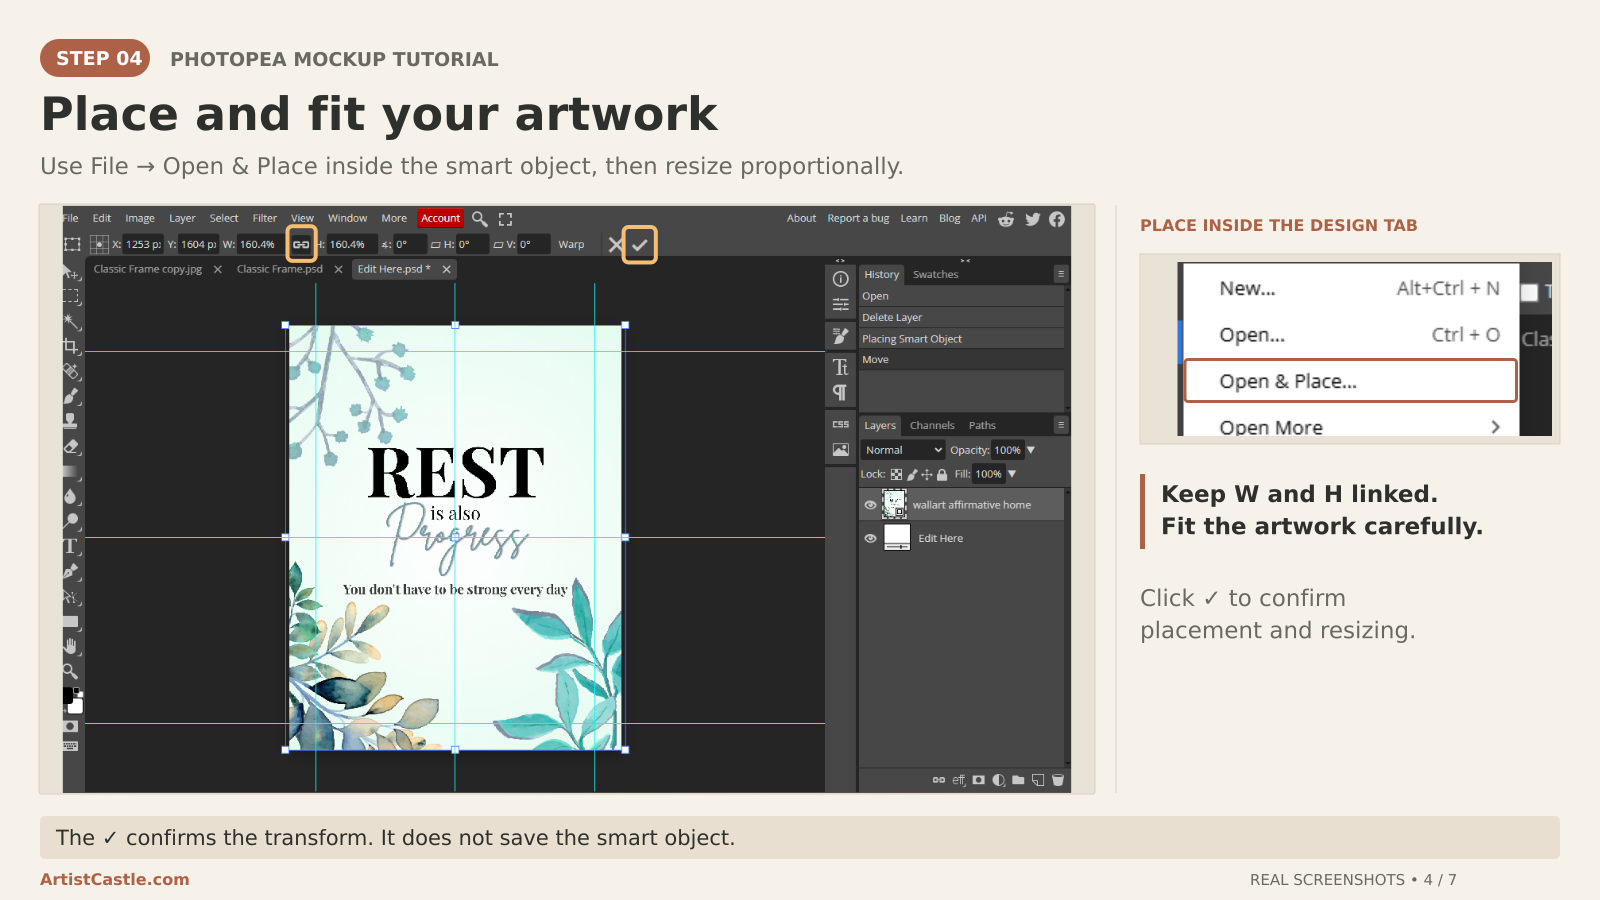
With the smart object tab active, choose File → Open & Place and select your artwork. Keep it above the Edit Here base layer, and leave any effect layers where the template placed them.
Dragging a file in also works, but where you drop it matters. Photopea’s guide says a file dropped on the document canvas is added to that document as a new layer, while a file dropped on the tab bar opens as a separate document. For this step, use the canvas.

Next, resize the artwork. Make sure the chain between W and H is enabled so the proportions stay linked, then drag a corner handle or adjust the values. Never stretch the image. If your artwork is a different shape from the placeholder area, covering the whole area may crop the outer edges, while fitting the complete image may leave borders. Choose whichever suits your design, then click the checkmark at the top to confirm the placement and resizing (Photopea’s Free Transform guide covers the controls).
Step 5: Save the smart object
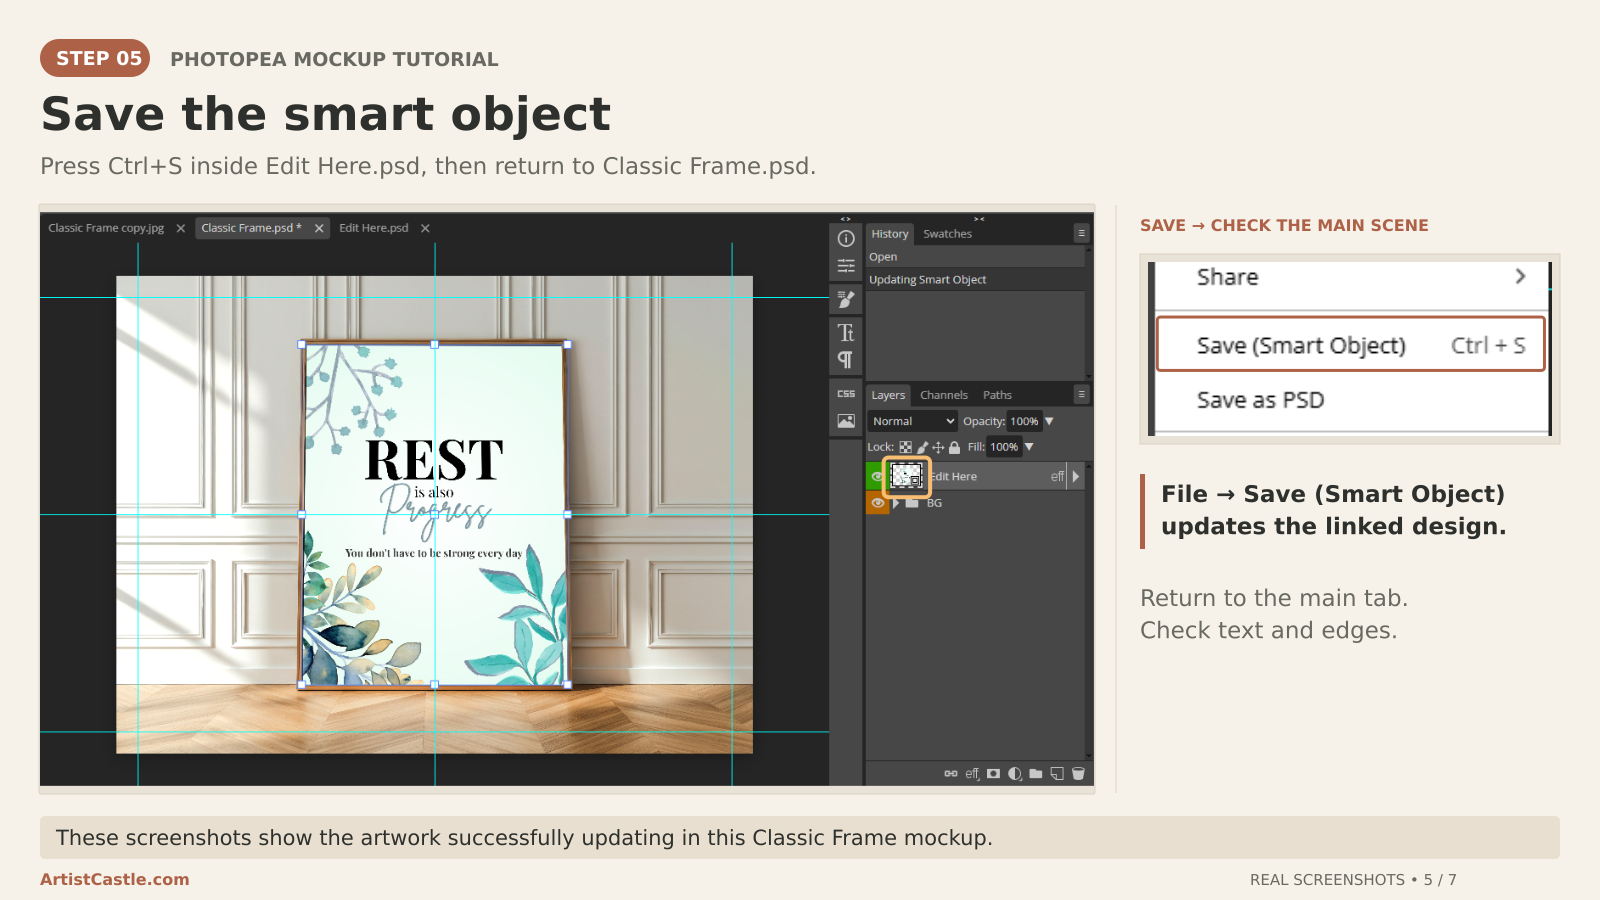
The checkmark confirms the placement, but it doesn’t save the smart object. While you are still in the smart object tab, press Ctrl+S or choose File → Save (Smart Object). Then switch to the main Classic Frame.psd tab. Your artwork should appear in the frame with the scene’s lighting and shadows. Check for gaps, stretching and leftover sample art.
Step 6: Keep an editable PSD copy
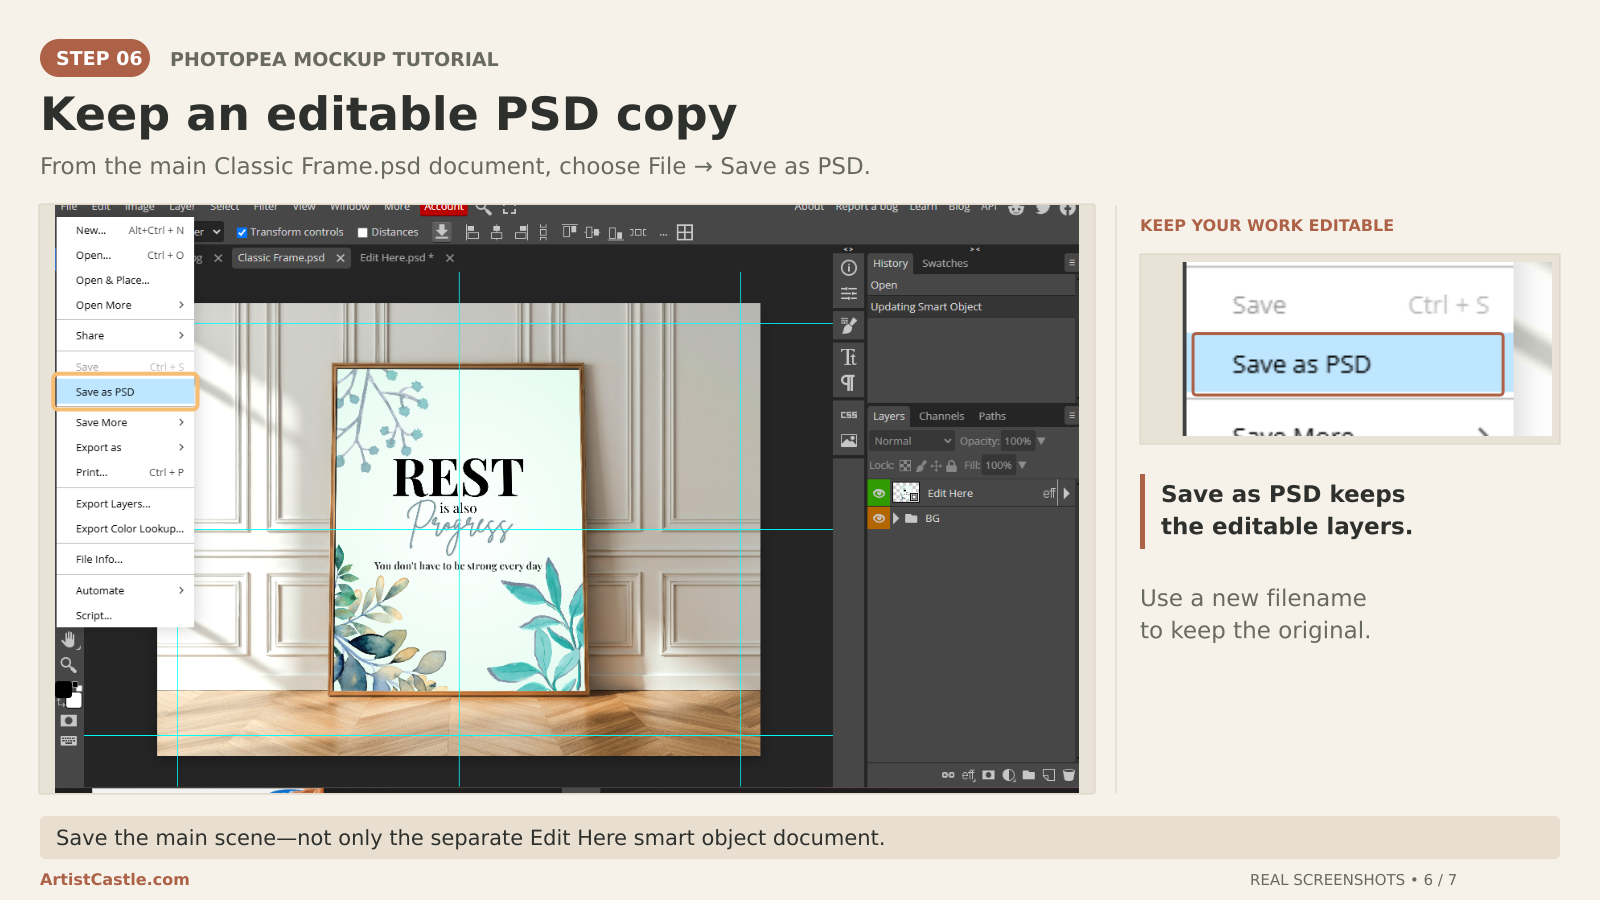
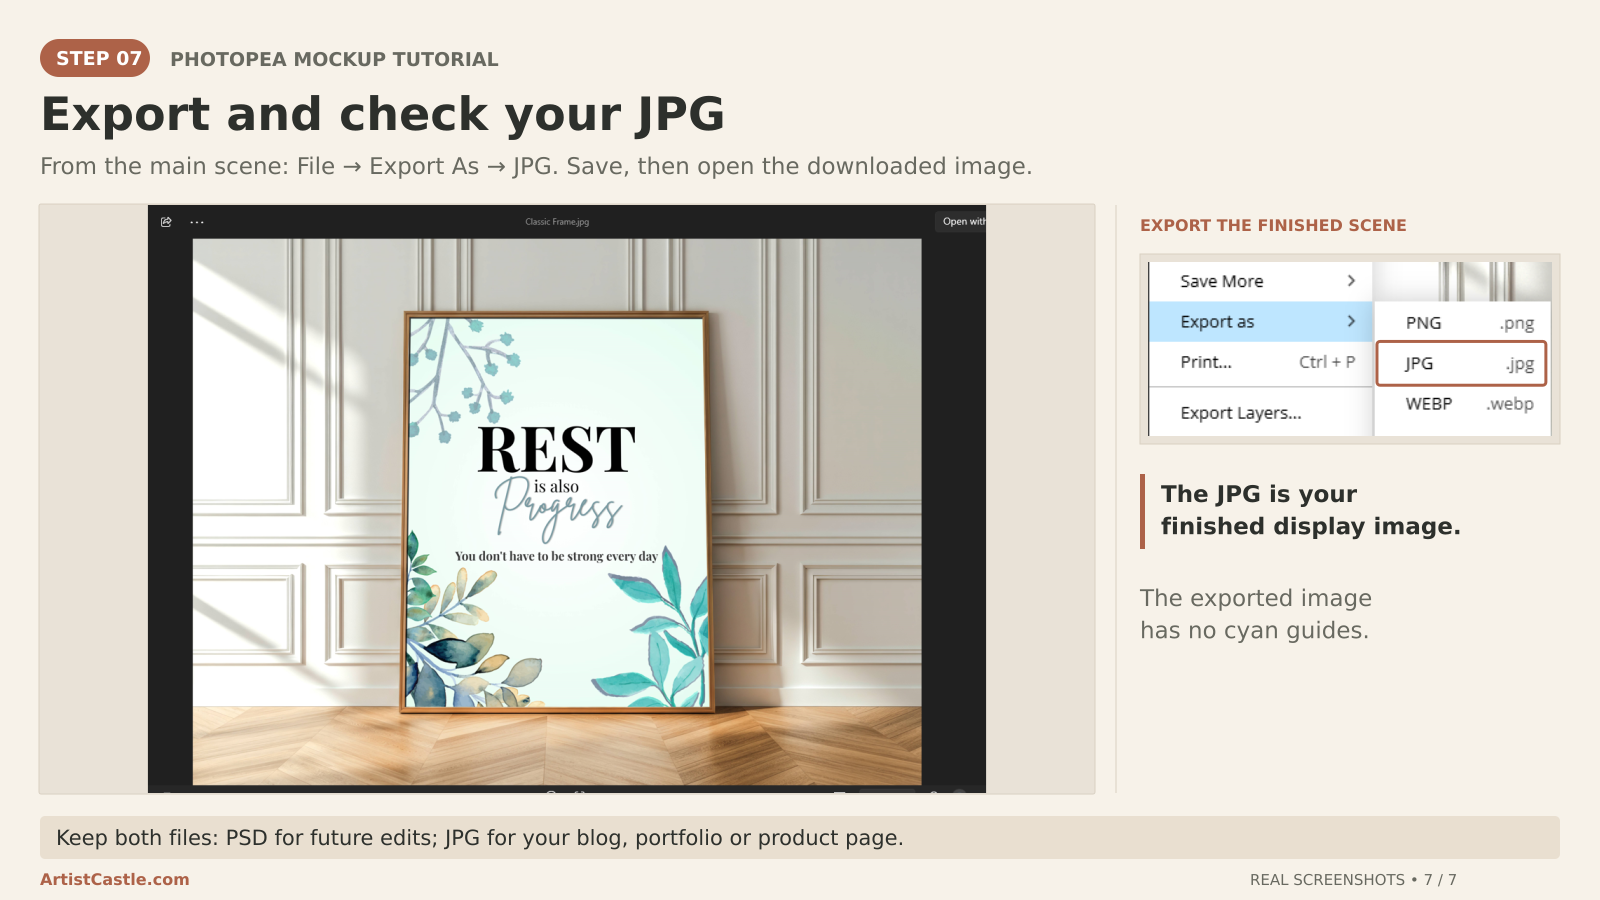
Stay in the main Classic Frame.psd tab, not the smart object tab, and choose File → Save as PSD. This keeps all the layers so you can swap the artwork later.
Step 7: Export and check your JPG
From the same main Classic Frame.psd tab, not the smart object tab, choose File → Export As → JPG and save the file. JPG usually suits listings and social posts, while PNG is lossless. Open the exported file outside Photopea to check it. In the demonstrated export, the JPG shows no cyan guides or transform handles, because those are editor overlays and not part of the image.
A tip if you design seamless patterns
The artwork in this example is wall art, not a seamless pattern. If you place a pattern, one enlarged tile won’t show the repeat, so build a repeated preview first. You can make a tile in ibisPaint X and test it before you use it. Remember too that the scale in a mockup is for presentation. For print size, see pattern repeat size vs. motif scale.
Troubleshooting
Nothing changed on the scene. You may have edited the main scene instead of the smart object, or you didn’t save the smart object. Go back to the smart object tab and press Ctrl+S, then switch to the main tab.
The sample design is still visible. Open the smart object and remove or hide the template’s sample artwork, following the mockup’s instructions.
The artwork looks stretched. Make sure the chain between W and H is enabled. Avoid holding Ctrl while you drag, because Photopea’s guide says it skews the content or changes perspective. For gaps or borders, see Step 4.
Photopea is slow or won’t load the file. Close other tabs and apps. Before you refresh, close or reopen Photopea, save any work you can still reach, such as with File → Save as PSD. Then try a different browser or a simpler mockup.
Free and paid mockups
For practice, start with a free file. Photopea has a templates page, and Mockup Cloud has a free mockups section.
If you later want more scenes for listings, such as stationery, print editorial or packaging, you can browse Mockup Cloud’s mockups. Before you buy, check the listing’s software requirement and licence. Try a free sample if one is available, or ask the seller about compatibility. A free mockup is plenty when it shows your design clearly.
Common questions
Can I use any Photoshop mockup in Photopea? Photopea is built around the PSD format, but results depend on the individual file. The Classic Frame listing names Photoshop as its intended software, so check the mockup you choose.
Can I use a mockup for commercial listings? Check the licence for that specific file. Mockup Cloud explains its terms on its licence page.